---
title: Fly.io and PlanetScale
layout: docs
toc: false
author: joshua
categories:
- app
nav: firecracker
date: 2022-05-24
---
<%= partial "/docs/partials/v2_needs_update" %>
PlanetScale is a MySQL-compatible serverless database. It now supports read replicas so you can perform low-latency reads wherever your users are located. This guide walks you through setting up PlanetScale with Fly.io apps.
We'll work with a [sample Express app](https://github.com/fly-apps/nodejs-planetscale-read-replicas/+external) for the [Fly platform](https://fly.io) which uses a [PlanetScale](https://planetscale.com+external) database.
## Create a database
The sample app assumes a database already exists. You'll need to create that database before running the app. Since read-only regions can currently only be created using the PlanetScale UI, this guide does not use their CLI.
[Sign in to PlanetScale](https://auth.planetscale.com/sign-in+external), creating an account if you don't already have one. You can use a free account to create a database however you will need to upgrade to their paid _Scaler_, _Team_, or _Enterprise_ [plan](https://planetscale.com/pricing+external) if you would like to add read-only regions.
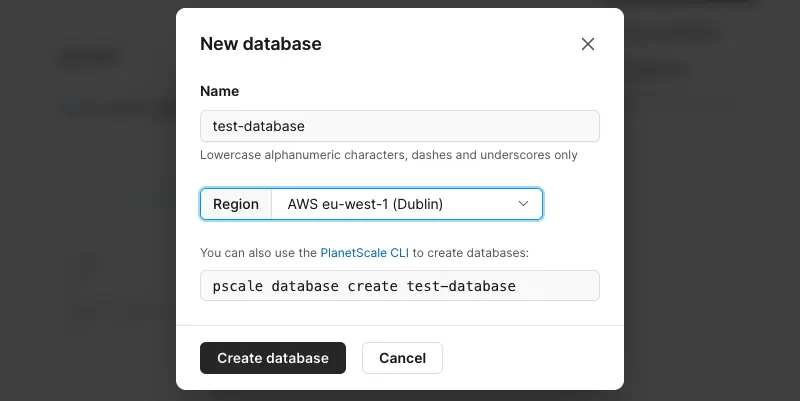
Click on the black 'New database' button and pick 'Create new database'. Give it a name and choose its region. This is your **primary** database (we'll refer to it in multiple places later on). Choose the closest region to where you will deploy your app for the best performance:
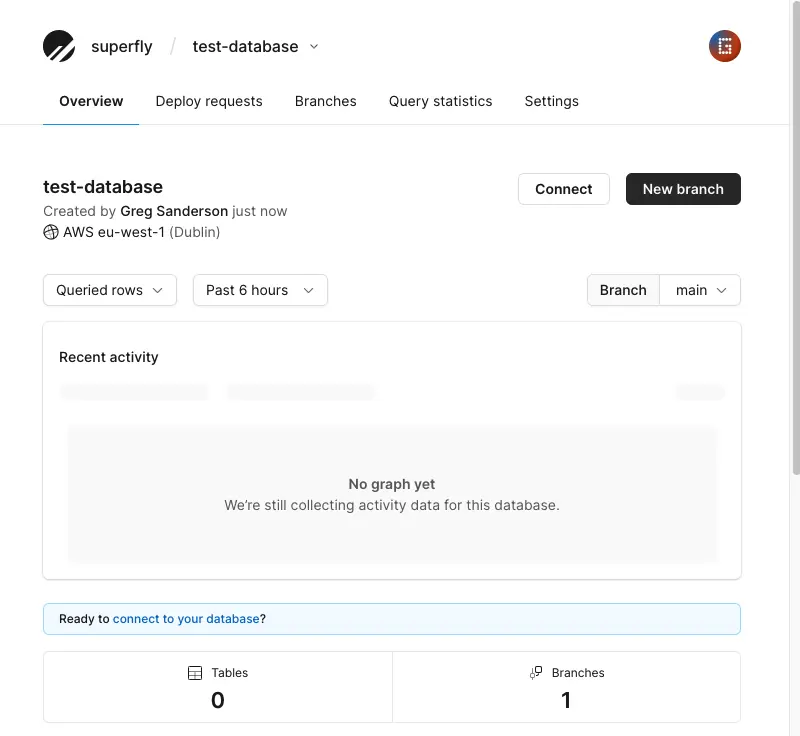
PlanetScale uses branches for schemas. An initial `main` branch will be automatically created. It will take a few seconds to initialise so wait until that notification disappears. You should see a page similar to this:
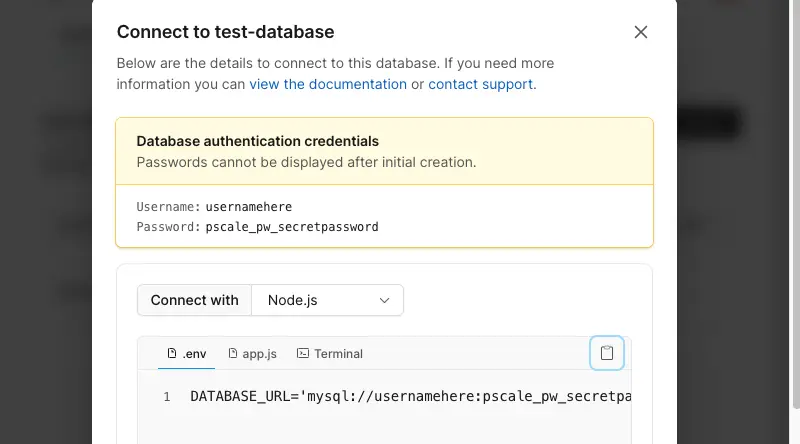
Click on the _Connect_ button (or on the blue _"connect to your database"_ link). A dialog will open showing your username and password. Handily PlanetScale makes connection strings for various clients. For this app we'll choose the one listed to connect with Node.js. When we mention using the connection string for your primary database below, _this_ is the one we mean. Make a temporary note of this as it will only show you it once:
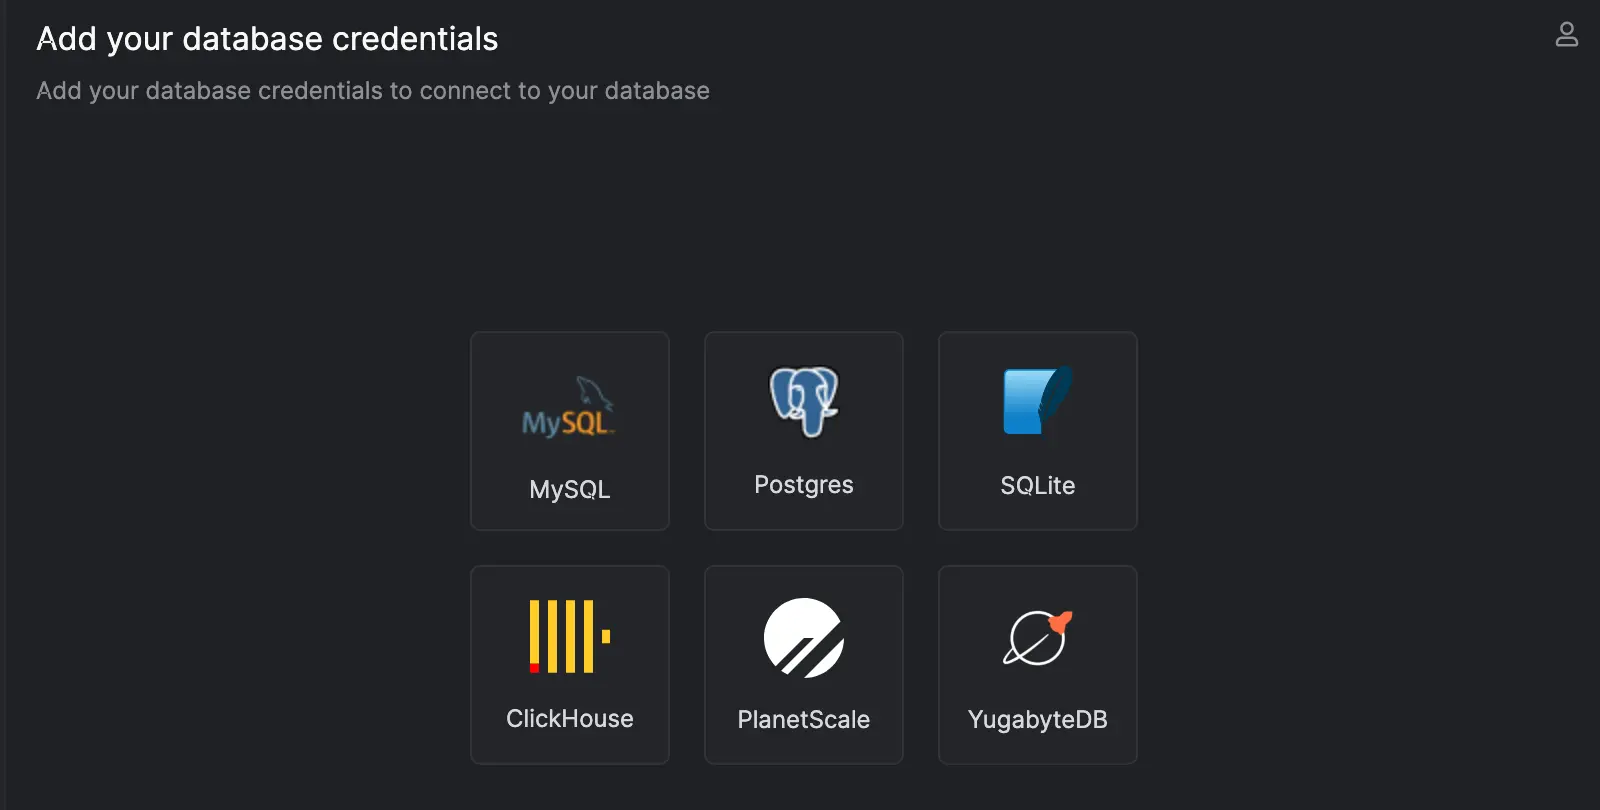
There are many SQL clients you could use to manage your database. We'll use [ArcType](https://arctype.com/). That comes with a PlanetScale integration. However to use its PlanetScale integration you need to create an Arctype account. For now we won't. So instead we'll use the standard _MySQL_ option. Click the appropriate option in your SQL client to create a new connection:
To save typing in all the details (a username, a password, and so on) we'll use that connection string noted above. Copy the entire value (starting from _"mysql://"_) into this box and then click the "Test connection" button. After a moment you should see a message to say it successfully connected. Click the blue "Save" button to proceed:

Click the blue "New Query" button in the top-right ready to run some basic SQL. Again, your editor will look slightly different:

We'll use the names of some fruits as some sample data. So paste this into your query editor and click the "Run" (or equivalent) button:
```sql
CREATE TABLE `fruits` (
  `id` int NOT NULL AUTO_INCREMENT PRIMARY KEY,
  `name` varchar(255) NOT NULL
);
```
You should see it succeeded:

Add a few rows to that table:
```sql
INSERT INTO `fruits` (id, name) VALUES  (1, 'banana');
INSERT INTO `fruits` (id, name) VALUES  (2, 'apple');
INSERT INTO `fruits` (id, name) VALUES  (3, 'strawberry');
```
Promote the main branch to production. The production branch is protected, highly available and is automatically backed up. You can promote a branch within the PlanetScale UI by simply clicking this button:

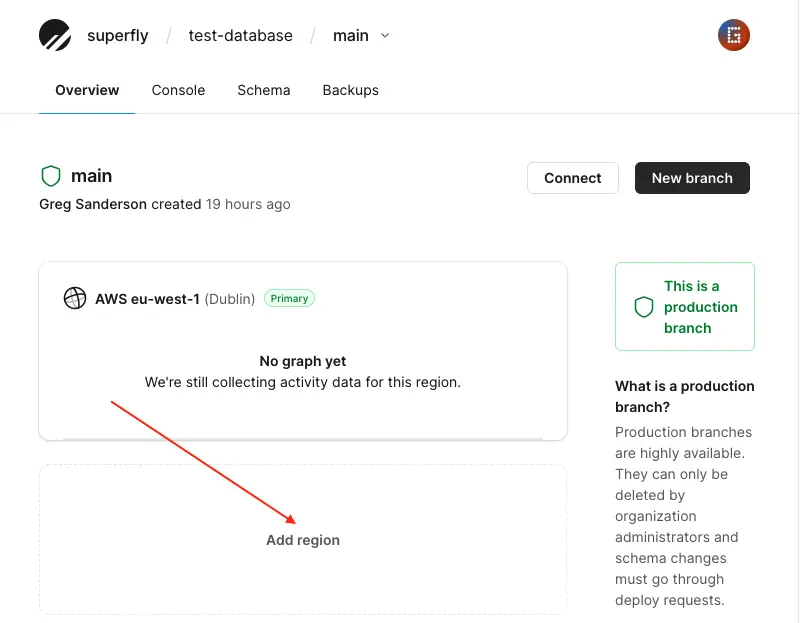
Assuming you have a _Scaler_, _Team_, or _Enterprise_ account, you will be able to add additional read-only regions. They can greatly improve the performance of your application, reducing the latency of reads from regions close to them. Click on the _main_ branch (the production one). You should see the option to _Add region_:
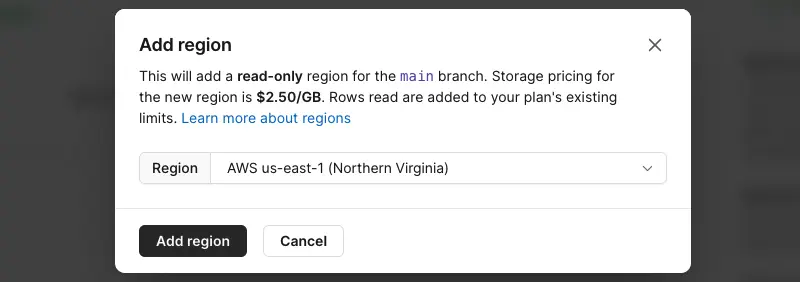
Choose the region you would like to create it in:
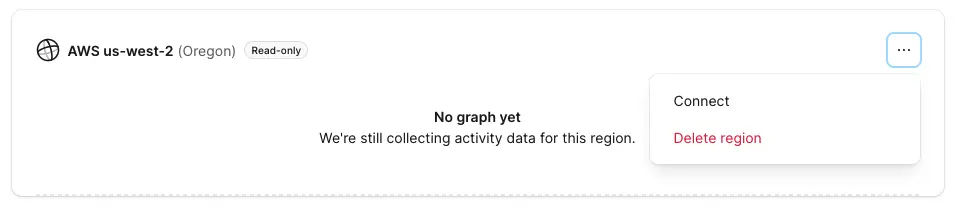
After a few moments those additional read-only regions should be ready. They may take slightly longer if there is a large amount of data to be replicated. Each region has its own, unique credentials. So click the "..." and then on _Connect_. It will show you a username, password and host. Make a connection string for each region that will look like this: "mysql://**username**:**password**@**host**/**database-name**?ssl={"rejectUnauthorized":true}":
Your database is now ready to be queried by our sample app!
## Run the app locally
To run it locally you will need [NodeJS](https://nodejs.org/en/download/+external).
1. Clone the [`nodejs-planetscale-read-replicas`](https://github.com/fly-apps/nodejs-planetscale-read-replicas+external) repo.
2. Run `npm install` to install its dependencies.
3. Duplicate `.env.example`, naming it `.env`.
4. The application needs to know about all the available regions. There are different ways this could be done. We've opted to use a single comma-separated string of connection strings. In the `.env`, set `DATABASE_URL` as _all_ of the connection URLs you have, separated by a comma. The **first** one should be the one for your **primary** (and possibly only) database. Follow it with those for any read-only regions you've added. It will look something like this. Note the comma between them:
```
DATABASE_URL='mysql://user1:password1@region1/name?ssl={"rejectUnauthorized":true},mysql://user2:password2@region2/name?ssl={"rejectUnauthorized":true}'
```
5. Run `npm start`.
6. You should be able to visit `http://localhost:3000` and see `hello world`: that confirms the app is running.
7. Visit `http://localhost:3000/read` and you should see a list of fruits fetched from PlanetScale. Note when run locally, this sample app does not know where you are in the world and so it can't pick the closest database. It will default to using the _first_ connection string (which must be the primary).
8. Visit `http://localhost:3000/write` and you should see a row has been added to the PlanetScale database. Normally data is added by a non-GET request however using a GET makes it easier to check using a browser.
You've successfully connected to a PlanetScale database!
## Deploy the app to Fly
If you haven't already done so, [install the Fly CLI](/docs/flyctl/install/) and then [log in to Fly](/docs/getting-started/sign-up-sign-in/).
We've added a few files to make this sample app ready to run on Fly: a `Dockerfile`, `.dockerignore` and `fly.toml`. The `Dockerfile` tells Fly how to _package_ the application. The `.dockerignore` file specifies the files/folders we want included (else it would include ones like `.env` that we do not want). The `fly.toml` file _configures_ the application. The Fly CLI can make that for you. But since we know which variables, ports, services and so on our app needs, we made one.
**Note:** You'll need to make two changes to the provided `fly.toml`:
1. Update the app's name at the top to one of your choice `app = "your-name-here"`.
2. Update the region to the one nearest _your_ primary database: `PRIMARY_REGION = "lhr"`. We created _our_ database in `eu-west`. But Fly uses different region names than PlanetScale. And so you need to use the Fly region you would want your primary PlanetScale database to always be used from. As an example, let's say you have a PlanetScale database in _eu-west-1_. You plan on having a Fly app deployed to `lhr` and `iad`. You would set `PRIMARY_REGION = "lhr"` in the `fly.toml`, because that is the closest Fly region to the primary database's region.
To deploy the app, run `fly launch` from the application's directory.
The Fly CLI will spot the existing `fly.toml`:
```
An existing fly.toml file was found for app-name
? Would you like to copy its configuration to the new app? (y/N)
```
Type _y_ (yes).
The CLI will then spot the `Dockerfile`:
```
Scanning source code
Detected a Dockerfile app
```
You'll be asked to give the app a name. Type a name using lowercase characters and hyphens, for example **your-app-here**.
You'll be prompted to pick an organization. Since every Fly user has a personal organization, let's pick that for now.
You'll be asked for the region to deploy the first vm to. That will be the same value you set for `PRIMARY_REGION` above. For example, `lhr`.
It will ask if you want a PostgreSQL database. Type _N_ (no) as you are using PlanetScale for its database!
Finally you are asked if you want to deploy. Type _N_ (no). Why not deploy now? This sample application expects a `DATABASE_URL` connection string to be available as a secret environment variable. Now that your app is staged on Fly we can set that. So run this command (setting its value as a comma-separated list of _all_ of the connection strings you have from PlanetScale). The sample app expects the **first one** to be the connection string for your **primary database** (the region you created the PlanetScale database in). Any _subsequent_ ones are the connection strings for any read-only regions. The resulting command you need to run will look something like this. Note the comma _between_ the connection strings:
```cmd
fly secrets set DATABASE_URL='mysql://your-primary-region-one,mysql://optional-for-read-region,mysql://optional-for-another-read-region'
```
You should see `Secrets are staged for the first deployment`.
Now you can go ahead and deploy the app:
```cmd
fly deploy
```
You should see the build progress and after a couple of minutes the application will be successfully deployed:
```
==> Monitoring deployment
 1 desired, 1 placed, 1 healthy, 0 unhealthy [health checks: 2 total, 2 passing]
--> v0 deployed successfully
```
If you open its URL `https://your-app-here.fly.dev` you should see the "hello world" text to confirm the app is working.
If you now open its _read_ page `https://your-app-here.fly.dev/read` you should see a list of fruits read from the _closest_ PlanetScale database. And since the primary region is the closest, well it makes sense to use that:
```json
{
  "time": 15,
  "usingFlyRegion": "lhr",
  "usingPrimaryRegion": true,
  "usingDatabaseHost": "random.eu-west-3.psdb.cloud",
  "data": [
    {
      "id": 7,
      "name": "grape"
    },
    {
      "id": 6,
      "name": "grape"
    },
    {
      "id": 5,
      "name": "lemon"
    }
  ]
}
```
If you open its _write_ page `https://your-app-here.fly.dev/write` you should see a random row of data has been written. Again, this request is handled by a vm in the primary region and so the write is sent to the _primary_ PlanetScale database:
```json
{
  "time": 18,
  "usingFlyRegion": "lhr",
  "usingPrimaryRegion": true,
  "usingDatabaseHost": "random.eu-west-3.psdb.cloud",
  "data": "Added a row with ID 8"
}
```
## Scaling the app
So far the app has _only_ used the primary database. Since there is only _one_ vm.
Now we'll test the read-only regions. Start by permitting the app to run in more regions. You can see which regions the app can run in using:
```cmd
fly regions list
```
You'll see something like:
```
Region Pool:
lhr
Backup Region:
```
Adjust that to permit more regions. For our test database, we made a primary in `eu-west-1` (Ireland), and two read-only regions in `us-west-2` (US) and `ap-southeast-2` (Australia). Suitably distributed to test the latency. And so we'll adjust the regions our sample Fly app can run in to use roughly matching Fly regions:
```cmd
fly regions set lhr sea syd
```
Now we need to scale the app to put a vm in each of those regions:
```cmd
fly scale count 3 --max-per-region=1
```
**Note:** If you run `fly scale show` you may see `Max Per Region: Not set`. This is a known issue however the value _is_ set.
Confirm the new vms have been placed by waiting a few moments and then running `fly status`. Wait a minute until all three have a status of `running`:
```
Instances
ID              PROCESS VERSION REGION  DESIRED STATUS  HEALTH CHECKS           RESTARTS        CREATED
abcdefgh        app     2       syd     run     running 2 total, 2 passing      0               33s ago
abcdefgh        app     2       sea     run     running 2 total, 2 passing      0               33s ago
abcdefgh        app     2       lhr     run     running 2 total, 2 passing      0               1m2s ago
```
**Note:** You may want to run `fly logs`. If you have not edited our sample app to remove our debug logs, you should see each vm making a choice at run-time for which database it should connect to. For example for the vm launched in `sea` _we_ saw _... the closest available database should be this one: us-west.connect.psdb.cloud_. For the vm launched in `syd` we _instead_ saw: _...the closest available database should be this one: aws-ap-southeast-2.connect.psdb.cloud_. Perfect! Each of those vms connected to the _closest_ database. You may need to adjust your region preferences (please take a look at `database.js` to see how we picked them).
Back to the test.
Now those two new vms are running, try calling the `https://app-name-here.fly.dev/read` and the `https://app-name-here.fly.dev/write` again. This time look at the value of `"usingFlyRegion"` in the response to see where the request was handled. If that value is your primary region (in our case that was `lhr`) any read-only regions _won't_ be used. As there is no _need_ for them to be. So to test any read-only regions you need to make a request from somewhere _else_, closer to one of the other vms.
In our case, we want to make a request that will be served by the vm we have in the US. That could be done in a variety of ways. You could use an online tool. We opted to use another Fly app we have to simulate requests from a particular location. It has a vm in the `sjc` (US) region. We connected to that vm using `fly ssh console` and ran a couple of curl commands ...
#### Read
```
#curl https://app-name-here.fly.dev/read
{"time":19,"usingFlyRegion":"sea","usingPrimaryRegion":false,"usingDatabaseHost":"us-west.connect.psdb.cloud","data":[{"id":9,"name":"lemon"},{"id":8,"name":"blueberry"},{"id":7,"name":"grape"}]}
```
Perfect! We can see from that response that this request worked. It was handled by the vm in `sea` (the closest vm _this_ app has to our simulated user in `sjc`). The response shows which database it fetched the data about our fruits from: the read-only region `us-west.connect.psdb.cloud`! This confirms it didn't need to connect to the primary database, far away in Europe. A fast, low-latency read.
#### Write
```
#curl https://app-name-here.fly.dev/write
#{"time":20,"usingFlyRegion":"lhr","usingPrimaryRegion":true,"usingDatabaseHost":"random.eu-west-3.psdb.cloud","data":"Added a row with ID 10"}
```
Perfect! We can see from that response that this request worked. It was handled in our primary region (`lhr`). And so the write succeeded. Despite the closest database to `sea` actually being a read-only replica. But wait ... how does this work? Well, we can see by looking at the logs for this app:
```
2022-05-19T19:09:42Z app[abcdefgh] sea [info]Replaying this attempt to write to a read replica (from Fly region: sea) in the primary Fly region: lhr
```
That line is logged by our app's custom error handler, in `server.js`. Initially the write request was received by the closest vm to the simulated user (in the US). And that vm connected to the _closest_ database (in the US). But ... that's a read-only replica. And so that write failed, throwing an error. That error was caught by the error handler, analysed and matched. And so the app used some Fly magic to _replay_ the HTTP request _in_ the primary region (in our case that's `lhr`). And a vm in that region connects to the primary database. Which _can_ of course be written to. And so the write worked.
## How does it know which database is closest?
If there is only one connection string in the `DATABASE_URL`, no decision needs to be made. That is used regardless of where in the world the app is running. That would be the case if you don't have any read replicas.
If there are multiple connection strings in the `DATABASE_URL`, the app needs to decide which one of them it should connect to. If you take a look at our sample app's `database.js` you will see it takes a _rough_ guess at which regions it would _prefer_ to connect to (ideally the closest). And then it sees which of those regions actually has a database. By looking for a connection string that uses a host in that region. If it can't find one, it defaults to connecting to the primary.
If your app only uses a couple of regions, it would probably be simpler for you to instead have _more_ environment variables and _less_ code. You could add an environment variable per region, such as `DATABASE_URL_LHR`, `DATABASE_URL_FRA` ... and so on. And then pick the appropriate one based on the value of `FLY_REGION` that is provided at run-time as an environment variable. You don't have to do it the same way we did!
## Issues
If you try deploying the app to Fly and that fails, the most _likely_ reason is your `DATABASE_URL` contains at least one invalid connection string. When each vm starts, the app tries to connect to the database. If it can't (such as the provided password is wrong) it will throw an error. You can confirm that is the case by running `fly logs` after a failed deploy. If you see a line such as `sea [info]Error: Access denied for user 'username-here'` please check all your connection strings are correct and there is no space between the commas.
## Notes
- If you have any read-only replicas and use this approach (replaying a write to them using Fly's `fly-replay` header) make sure to not enable auto-scaling for your app. There is currently an issue where vms are not evenly distributed and so you can be sure there will be a vm in your primary region. And if not, writes to the database will fail.
- For this example we used the same branch for local development _and_ on Fly. In reality you would have a development branch and a separate production branch. As such, the connection string(s) in your local `.env` file would differ from the one your application uses on Fly. And in fact would likely instead be a local installation of MySQL to reduce costs.
- Adding additional regions in PlanetScale increases the cost of storage. For example if your primary database is 10GB, adding an additional region (for a read replica) would double the cost of storage.
- Make sure to keep an eye on usage. If you exceed your included monthly allowance you are billed an additional fee:

- Since the usage is based on rows read (not rows fetched) make sure all of your queries are optimised. If they don't use an index, they could result in a table scan which will increase your costs.
- Your application may _not_ benefit from adding read-only regions if it does substantially more writes than reads. In which case the saving on latency for reads may not justify the increased storage cost.
## View your application on Fly
Use `fly apps open` as a shortcut to open the app's URL in your browser.
Use `fly logs` to see its log files.
Use `fly status` to see its details:
```
App
  Name     = your-app
  Owner    =
  Version  = 1
  Status   = running
  Hostname = your-app.fly.dev

Deployment Status
  ID          = 67c6d3a4-963f-46cf-b694-d7e28aea6600
  Version     = v1
  Status      = successful
  Description = Deployment completed successfully
  Instances   = 1 desired, 1 placed, 1 healthy, 0 unhealthy

Instances
ID          PROCESS VERSION REGION  DESIRED STATUS  HEALTH CHECKS       RESTARTS    CREATED
abcdefgh    app     1       lhr     run     running 2 total, 2 passing  0           0h1m ago
```
## Delete the app
To avoid charges you might want to delete the app and the PlanetScale database:
- To delete the sample Fly app (this is irreversible), run `fly apps destroy the-app-name-here`
- To delete the PlanetScale database, click the red delete button within the database's _Settings_ tab:

Fly.io and PlanetScale
We haven’t yet updated this page for Fly Machines, which are the VMs now at the core of all Fly Apps. You might notice that some features don’t work the same way anymore. Visit our community forum if you need help with your app.
PlanetScale is a MySQL-compatible serverless database. It now supports read replicas so you can perform low-latency reads wherever your users are located. This guide walks you through setting up PlanetScale with Fly.io apps.
The sample app assumes a database already exists. You’ll need to create that database before running the app. Since read-only regions can currently only be created using the PlanetScale UI, this guide does not use their CLI.
Sign in to PlanetScale, creating an account if you don’t already have one. You can use a free account to create a database however you will need to upgrade to their paid Scaler, Team, or Enterpriseplan if you would like to add read-only regions.
Click on the black ‘New database’ button and pick ‘Create new database’. Give it a name and choose its region. This is your primary database (we’ll refer to it in multiple places later on). Choose the closest region to where you will deploy your app for the best performance:
PlanetScale uses branches for schemas. An initial main branch will be automatically created. It will take a few seconds to initialise so wait until that notification disappears. You should see a page similar to this:
Click on the Connect button (or on the blue “connect to your database” link). A dialog will open showing your username and password. Handily PlanetScale makes connection strings for various clients. For this app we’ll choose the one listed to connect with Node.js. When we mention using the connection string for your primary database below, this is the one we mean. Make a temporary note of this as it will only show you it once:
There are many SQL clients you could use to manage your database. We’ll use ArcType. That comes with a PlanetScale integration. However to use its PlanetScale integration you need to create an Arctype account. For now we won’t. So instead we’ll use the standard MySQL option. Click the appropriate option in your SQL client to create a new connection:
To save typing in all the details (a username, a password, and so on) we’ll use that connection string noted above. Copy the entire value (starting from “mysql://”) into this box and then click the “Test connection” button. After a moment you should see a message to say it successfully connected. Click the blue “Save” button to proceed:
Click the blue “New Query” button in the top-right ready to run some basic SQL. Again, your editor will look slightly different:
We’ll use the names of some fruits as some sample data. So paste this into your query editor and click the “Run” (or equivalent) button:
Promote the main branch to production. The production branch is protected, highly available and is automatically backed up. You can promote a branch within the PlanetScale UI by simply clicking this button:
Assuming you have a Scaler, Team, or Enterprise account, you will be able to add additional read-only regions. They can greatly improve the performance of your application, reducing the latency of reads from regions close to them. Click on the main branch (the production one). You should see the option to Add region:
Choose the region you would like to create it in:
After a few moments those additional read-only regions should be ready. They may take slightly longer if there is a large amount of data to be replicated. Each region has its own, unique credentials. So click the “…” and then on Connect. It will show you a username, password and host. Make a connection string for each region that will look like this: “mysql://username:password@host/database-name?ssl={"rejectUnauthorized”:true}“:
Your database is now ready to be queried by our sample app!
The application needs to know about all the available regions. There are different ways this could be done. We’ve opted to use a single comma-separated string of connection strings. In the .env, set DATABASE_URL as all of the connection URLs you have, separated by a comma. The first one should be the one for your primary (and possibly only) database. Follow it with those for any read-only regions you’ve added. It will look something like this. Note the comma between them:
DATABASE_URL='mysql://user1:password1@region1/name?ssl={"rejectUnauthorized":true},mysql://user2:password2@region2/name?ssl={"rejectUnauthorized":true}'
Run npm start.
You should be able to visit http://localhost:3000 and see hello world: that confirms the app is running.
Visit http://localhost:3000/read and you should see a list of fruits fetched from PlanetScale. Note when run locally, this sample app does not know where you are in the world and so it can’t pick the closest database. It will default to using the first connection string (which must be the primary).
Visit http://localhost:3000/write and you should see a row has been added to the PlanetScale database. Normally data is added by a non-GET request however using a GET makes it easier to check using a browser.
You’ve successfully connected to a PlanetScale database!
We’ve added a few files to make this sample app ready to run on Fly: a Dockerfile, .dockerignore and fly.toml. The Dockerfile tells Fly how to package the application. The .dockerignore file specifies the files/folders we want included (else it would include ones like .env that we do not want). The fly.toml file configures the application. The Fly CLI can make that for you. But since we know which variables, ports, services and so on our app needs, we made one.
Note: You’ll need to make two changes to the provided fly.toml:
Update the app’s name at the top to one of your choice app = "your-name-here".
Update the region to the one nearest your primary database: PRIMARY_REGION = "lhr". We created our database in eu-west. But Fly uses different region names than PlanetScale. And so you need to use the Fly region you would want your primary PlanetScale database to always be used from. As an example, let’s say you have a PlanetScale database in eu-west-1. You plan on having a Fly app deployed to lhr and iad. You would set PRIMARY_REGION = "lhr" in the fly.toml, because that is the closest Fly region to the primary database’s region.
To deploy the app, run fly launch from the application’s directory.
The Fly CLI will spot the existing fly.toml:
An existing fly.toml file was found for app-name
? Would you like to copy its configuration to the new app? (y/N)
Type y (yes).
The CLI will then spot the Dockerfile:
Scanning source code
Detected a Dockerfile app
You’ll be asked to give the app a name. Type a name using lowercase characters and hyphens, for example your-app-here.
You’ll be prompted to pick an organization. Since every Fly user has a personal organization, let’s pick that for now.
You’ll be asked for the region to deploy the first vm to. That will be the same value you set for PRIMARY_REGION above. For example, lhr.
It will ask if you want a PostgreSQL database. Type N (no) as you are using PlanetScale for its database!
Finally you are asked if you want to deploy. Type N (no). Why not deploy now? This sample application expects a DATABASE_URL connection string to be available as a secret environment variable. Now that your app is staged on Fly we can set that. So run this command (setting its value as a comma-separated list of all of the connection strings you have from PlanetScale). The sample app expects the first one to be the connection string for your primary database (the region you created the PlanetScale database in). Any subsequent ones are the connection strings for any read-only regions. The resulting command you need to run will look something like this. Note the comma between the connection strings:
fly secrets set DATABASE_URL='mysql://your-primary-region-one,mysql://optional-for-read-region,mysql://optional-for-another-read-region'
You should see Secrets are staged for the first deployment.
Now you can go ahead and deploy the app:
fly deploy
You should see the build progress and after a couple of minutes the application will be successfully deployed:
If you open its URL https://your-app-here.fly.dev you should see the "hello world” text to confirm the app is working.
If you now open its read page https://your-app-here.fly.dev/read you should see a list of fruits read from the closest PlanetScale database. And since the primary region is the closest, well it makes sense to use that:
If you open its write page https://your-app-here.fly.dev/write you should see a random row of data has been written. Again, this request is handled by a vm in the primary region and so the write is sent to the primary PlanetScale database:
{"time":18,"usingFlyRegion":"lhr","usingPrimaryRegion":true,"usingDatabaseHost":"random.eu-west-3.psdb.cloud","data":"Added a row with ID 8"}
Scaling the app
So far the app has only used the primary database. Since there is only one vm.
Now we’ll test the read-only regions. Start by permitting the app to run in more regions. You can see which regions the app can run in using:
fly regions list
You’ll see something like:
Region Pool:
lhr
Backup Region:
Adjust that to permit more regions. For our test database, we made a primary in eu-west-1 (Ireland), and two read-only regions in us-west-2 (US) and ap-southeast-2 (Australia). Suitably distributed to test the latency. And so we’ll adjust the regions our sample Fly app can run in to use roughly matching Fly regions:
fly regions set lhr sea syd
Now we need to scale the app to put a vm in each of those regions:
fly scale count 3 --max-per-region=1
Note: If you run fly scale show you may see Max Per Region: Not set. This is a known issue however the value is set.
Confirm the new vms have been placed by waiting a few moments and then running fly status. Wait a minute until all three have a status of running:
Instances
ID PROCESS VERSION REGION DESIRED STATUS HEALTH CHECKS RESTARTS CREATED
abcdefgh app 2 syd run running 2 total, 2 passing 0 33s ago
abcdefgh app 2 sea run running 2 total, 2 passing 0 33s ago
abcdefgh app 2 lhr run running 2 total, 2 passing 0 1m2s ago
Note: You may want to run fly logs. If you have not edited our sample app to remove our debug logs, you should see each vm making a choice at run-time for which database it should connect to. For example for the vm launched in seawe saw … the closest available database should be this one: us-west.connect.psdb.cloud. For the vm launched in syd we instead saw: …the closest available database should be this one: aws-ap-southeast-2.connect.psdb.cloud. Perfect! Each of those vms connected to the closest database. You may need to adjust your region preferences (please take a look at database.js to see how we picked them).
Back to the test.
Now those two new vms are running, try calling the https://app-name-here.fly.dev/read and the https://app-name-here.fly.dev/write again. This time look at the value of "usingFlyRegion" in the response to see where the request was handled. If that value is your primary region (in our case that was lhr) any read-only regions won’t be used. As there is no need for them to be. So to test any read-only regions you need to make a request from somewhere else, closer to one of the other vms.
In our case, we want to make a request that will be served by the vm we have in the US. That could be done in a variety of ways. You could use an online tool. We opted to use another Fly app we have to simulate requests from a particular location. It has a vm in the sjc (US) region. We connected to that vm using fly ssh console and ran a couple of curl commands …
Perfect! We can see from that response that this request worked. It was handled by the vm in sea (the closest vm this app has to our simulated user in sjc). The response shows which database it fetched the data about our fruits from: the read-only region us-west.connect.psdb.cloud! This confirms it didn’t need to connect to the primary database, far away in Europe. A fast, low-latency read.
Write
#curl https://app-name-here.fly.dev/write
#{"time":20,"usingFlyRegion":"lhr","usingPrimaryRegion":true,"usingDatabaseHost":"random.eu-west-3.psdb.cloud","data":"Added a row with ID 10"}
Perfect! We can see from that response that this request worked. It was handled in our primary region (lhr). And so the write succeeded. Despite the closest database to sea actually being a read-only replica. But wait … how does this work? Well, we can see by looking at the logs for this app:
2022-05-19T19:09:42Z app[abcdefgh] sea [info]Replaying this attempt to write to a read replica (from Fly region: sea) in the primary Fly region: lhr
That line is logged by our app’s custom error handler, in server.js. Initially the write request was received by the closest vm to the simulated user (in the US). And that vm connected to the closest database (in the US). But … that’s a read-only replica. And so that write failed, throwing an error. That error was caught by the error handler, analysed and matched. And so the app used some Fly magic to replay the HTTP request in the primary region (in our case that’s lhr). And a vm in that region connects to the primary database. Which can of course be written to. And so the write worked.
How does it know which database is closest?
If there is only one connection string in the DATABASE_URL, no decision needs to be made. That is used regardless of where in the world the app is running. That would be the case if you don’t have any read replicas.
If there are multiple connection strings in the DATABASE_URL, the app needs to decide which one of them it should connect to. If you take a look at our sample app’s database.js you will see it takes a rough guess at which regions it would prefer to connect to (ideally the closest). And then it sees which of those regions actually has a database. By looking for a connection string that uses a host in that region. If it can’t find one, it defaults to connecting to the primary.
If your app only uses a couple of regions, it would probably be simpler for you to instead have more environment variables and less code. You could add an environment variable per region, such as DATABASE_URL_LHR, DATABASE_URL_FRA … and so on. And then pick the appropriate one based on the value of FLY_REGION that is provided at run-time as an environment variable. You don’t have to do it the same way we did!
Issues
If you try deploying the app to Fly and that fails, the most likely reason is your DATABASE_URL contains at least one invalid connection string. When each vm starts, the app tries to connect to the database. If it can’t (such as the provided password is wrong) it will throw an error. You can confirm that is the case by running fly logs after a failed deploy. If you see a line such as sea [info]Error: Access denied for user 'username-here' please check all your connection strings are correct and there is no space between the commas.
Notes
If you have any read-only replicas and use this approach (replaying a write to them using Fly’s fly-replay header) make sure to not enable auto-scaling for your app. There is currently an issue where vms are not evenly distributed and so you can be sure there will be a vm in your primary region. And if not, writes to the database will fail.
For this example we used the same branch for local development and on Fly. In reality you would have a development branch and a separate production branch. As such, the connection string(s) in your local .env file would differ from the one your application uses on Fly. And in fact would likely instead be a local installation of MySQL to reduce costs.
Adding additional regions in PlanetScale increases the cost of storage. For example if your primary database is 10GB, adding an additional region (for a read replica) would double the cost of storage.
Make sure to keep an eye on usage. If you exceed your included monthly allowance you are billed an additional fee:
Since the usage is based on rows read (not rows fetched) make sure all of your queries are optimised. If they don’t use an index, they could result in a table scan which will increase your costs.
Your application may not benefit from adding read-only regions if it does substantially more writes than reads. In which case the saving on latency for reads may not justify the increased storage cost.
View your application on Fly
Use fly apps open as a shortcut to open the app’s URL in your browser.
Use fly logs to see its log files.
Use fly status to see its details:
App
Name = your-app
Owner =
Version = 1
Status = running
Hostname = your-app.fly.dev
Deployment Status
ID = 67c6d3a4-963f-46cf-b694-d7e28aea6600
Version = v1
Status = successful
Description = Deployment completed successfully
Instances = 1 desired, 1 placed, 1 healthy, 0 unhealthy
Instances
ID PROCESS VERSION REGION DESIRED STATUS HEALTH CHECKS RESTARTS CREATED
abcdefgh app 1 lhr run running 2 total, 2 passing 0 0h1m ago
Delete the app
To avoid charges you might want to delete the app and the PlanetScale database:
To delete the sample Fly app (this is irreversible), run fly apps destroy the-app-name-here
To delete the PlanetScale database, click the red delete button within the database’s Settings tab:


