

Fly runs apps close to users by taking Docker images and transmogrifying them into micro-vms, running across the globe. You can ship a Laravel app on Fly.io in just a couple of minutes.
You can use fly launch to get you up and running quickly with Laravel, but let’s talk about all the other stuff you probably want:
- Redis
- MySQL
- cron (Laravel Scheduler)
- Queues
We’re gonna spin up a new Laravel installation, add some user authentication (backed by MySQL), setup Laravel’s scheduler, and then see how to use Redis for queues, session storage, and caching.
The Laravel Application
The first thing we need is a Laravel application. We can use fly launch to get one running really quickly.
# 1. Create a shiny, new Laravel app
composer create-project laravel/laravel laravel-fly
cd laravel-fly


# 2. Launch on Fly!
fly launch
# Set app name, select region, deploy now


# 3. View the site in your browser:
fly open
Redis
Rather than trying to run everything in one VM on Fly, extra “services” are best run as separate VMs.
You can create your own Redis instance on Fly, but you might find it easier to use the managed Redis by Upstash, which is just a few commands away.
If you do want to roll your own, you can follow the Laravel + Redis docs.
# A new, empty directory
mkdir redis && cd redis


# Create a new redis app (don't deploy it yet!)
fly launch --image flyio/redis:6.2.6 --no-deploy --name lara-redis


# Add a persistent volume so Redis data sticks around
# Note: Volumes only live within the region they are created
fly volumes create redis_server --size 1


# Update fly.toml config to use the volume
cat >> fly.toml <<TOML
[[mounts]]
  destination = "/data"
  source = "redis_server"
TOML


# Add a password (before launching!)
fly secrets set REDIS_PASSWORD=somepassword
A few things to note!
- We created a Volume. In conjunction with a tweak to
fly.toml, using persistent storage makes sure data isn’t lost when the app is re-deployed (however, volumes are specific to a single region). - We gave Redis a password (by setting a secret), we didn’t leave it open for just any old connection. This is required.
- As documented, don’t forget to edit the generated
fly.tomlfile to delete the[http_service]section, OR the[[services]]section, if present.
After that, we’re ready to deploy it.
fly deploy
Private Networking
We’ll want our application to talk to Redis. Luckily, private networks are a thing in Fly.
We named our Redis service lara-redis, which means other services (within our Fly organization) can reach the Redis service using hostname lara-redis.internal.
Laravel Config
We need to update the Laravel configuration to use Redis. Laravel needs to know the hostname and password of our Redis service.
Passwords are secrets, so we’ll set it as such in our app service.
cd ~/Fly/laravel-fly

# Add in our redis password secret to this app as well
fly secrets set REDIS_PASSWORD=somepassword
Adding a secret triggers a quick re-deploy. Neat!
The secret is set, but we also need additional (not-so-secret) configuration to tell Laravel where and how use Redis. Update the Laravel app’s fly.toml file:
[env]
  APP_ENV = "production"
  CACHE_DRIVER = "redis"
  SESSION_DRIVER = "redis"
  REDIS_HOST = "lara-redis.internal"
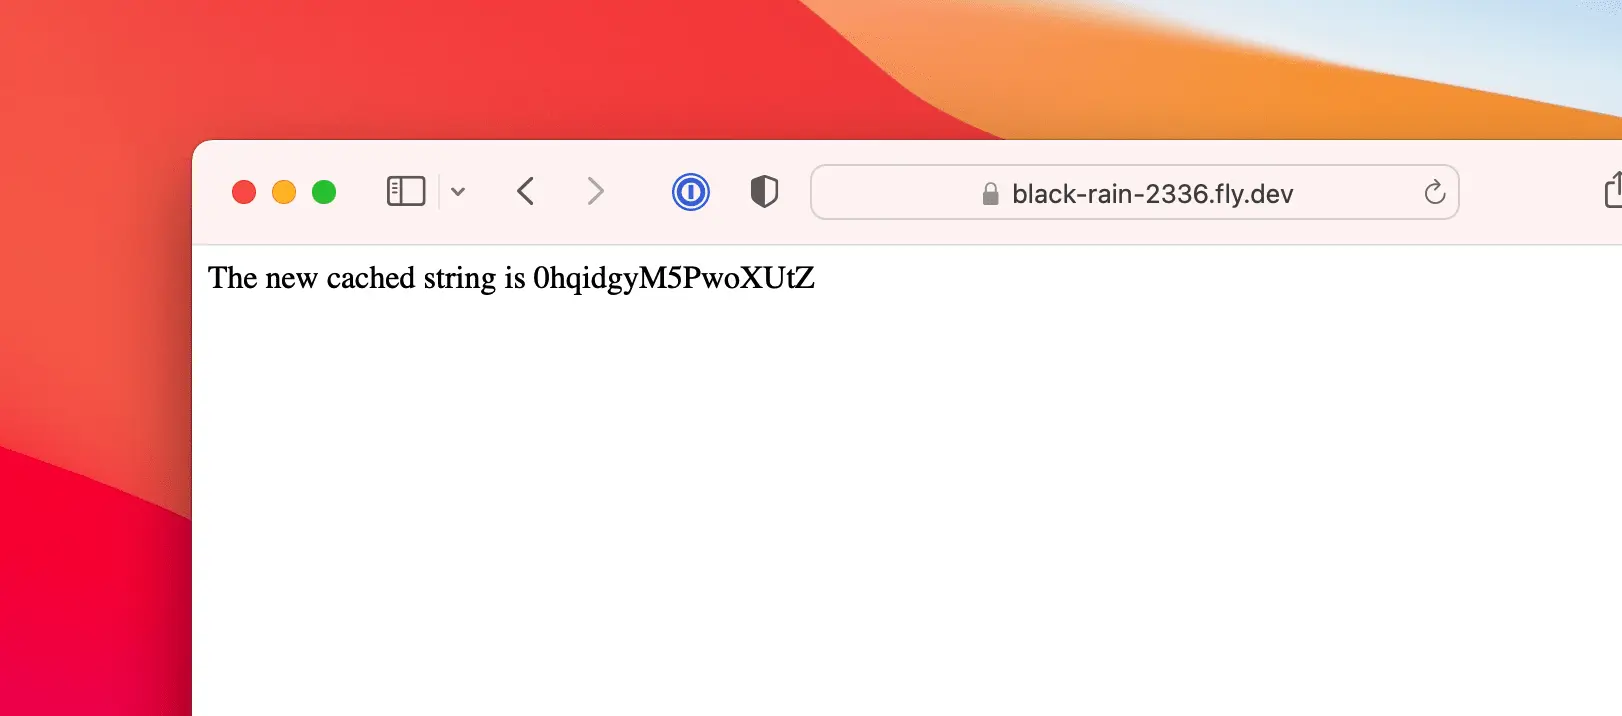
Let’s test that this works! If we edit file routes/web.php, we can add a route that uses Redis:
Route::get('/test', function() {
    Cache::put('new-key', Str::random(16));

    return "The new cached string is " . Cache::get('new-key');
});
We updated some files, we need to deploy again to get that change in place:
fly deploy
You should be able to head to your-app.fly.dev/test to see the result. If you don’t get any errors, then everything is working!
MySQL
Fly offers to set up an HA cluster of PostgreSQL for you.
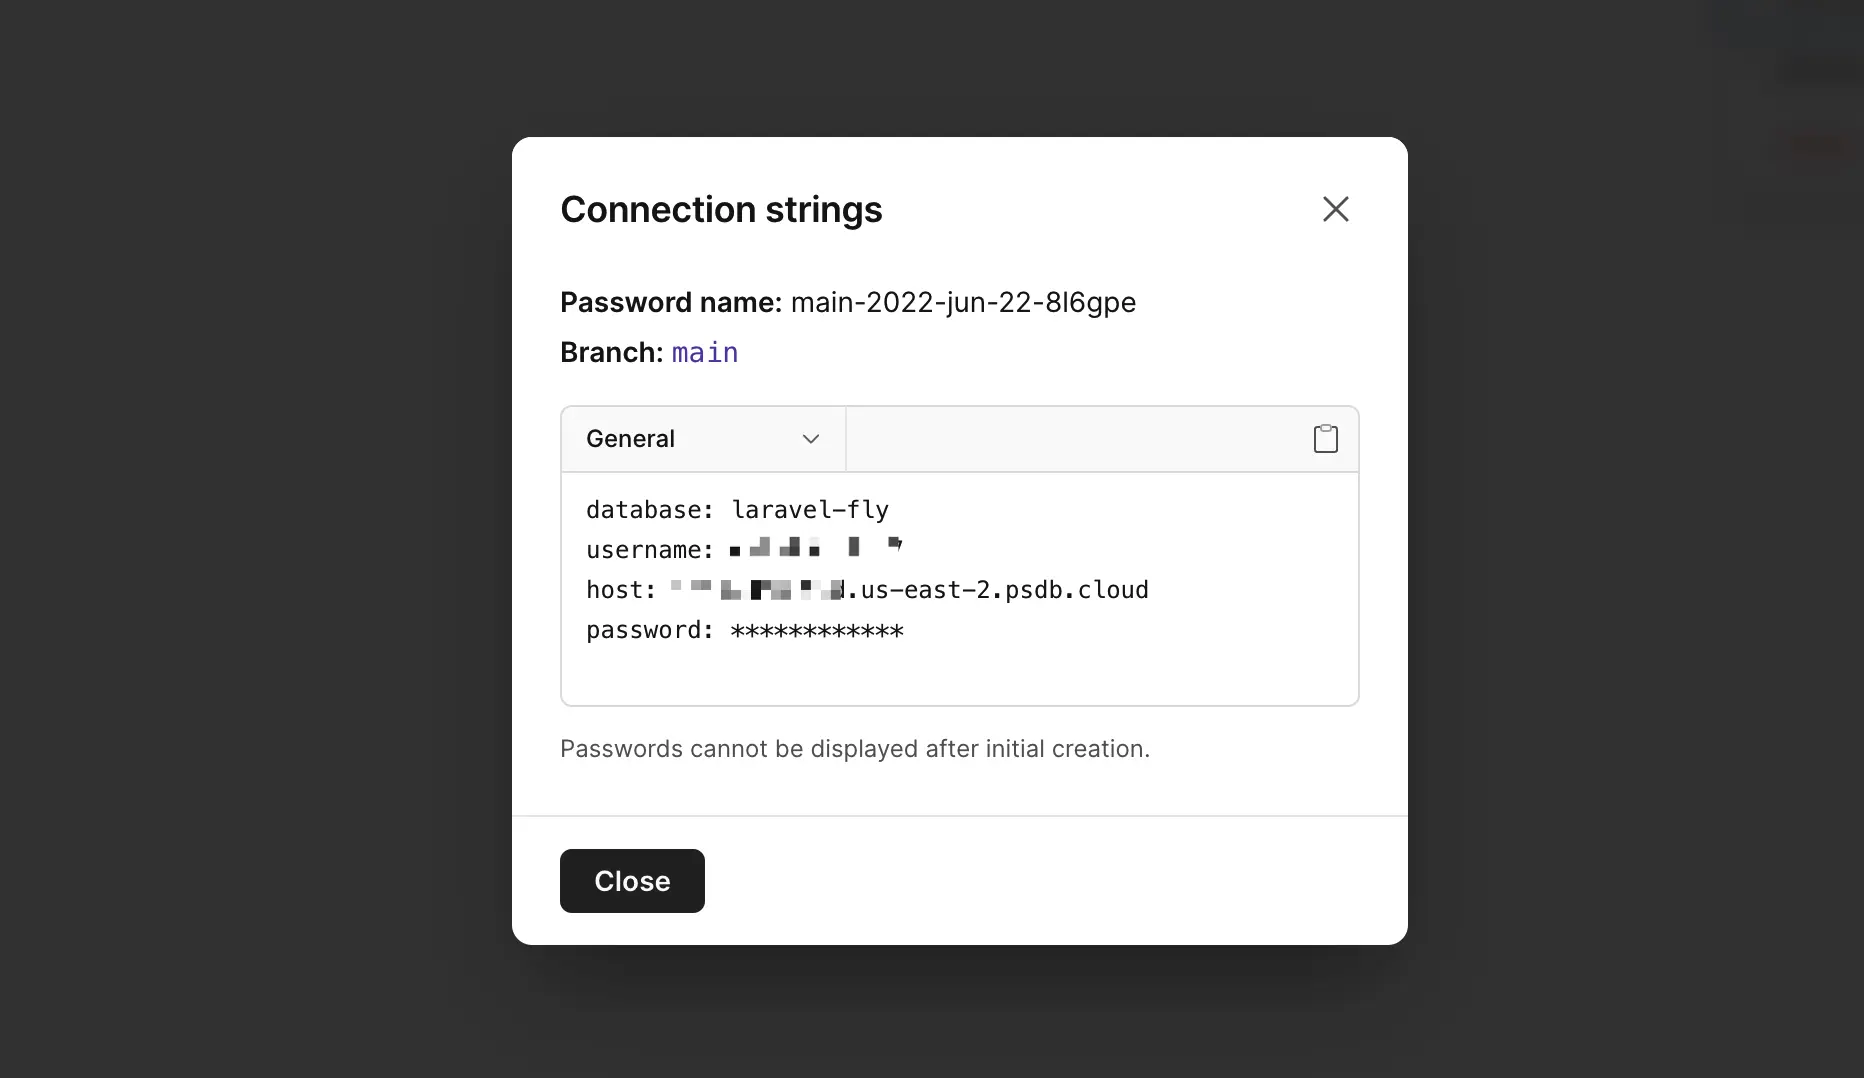
There’s no need to brag about it, but we know that MySQL is pretty great. For that, we can use PlanetScale in our Fly apps.
That link shows how to sign up and create a MySQL database on PlanetScale. Once created, we just need to add the proper configuration into our application.
You can also run MySQL as “just another Fly.io app” as well.
Edit fly.toml and update the environment variables:
[env]
  APP_ENV = "production"
  CACHE_DRIVER = "redis"
  SESSION_DRIVER = "redis"
  REDIS_HOST = "lara-redis.internal"

+  DB_CONNECTION = "mysql"
+  DB_HOST = "some_hostname.us-east-2.psdb.cloud"
+  DB_DATABASE= "laravel-fly"
+  MYSQL_ATTR_SSL_CA = "/etc/ssl/certs/ca-certificates.crt"
Note the addition of MYSQL_ATTR_SSL_CA=/etc/ssl/certs/ca-certificates.crt, which is required for connecting to databases on PlanetScale (Using TLS for remote database connections is extremely important)!
The value /etc/ssl/certs/ca-certificates.crt is correct for the container Fly setup for you via fly launch. See here for other possible values.
Laravel needs to know the username/password for the database as well. Those seem pretty secret, so let’s use secrets!
I opted to keep the hostname an environment variable, but you might want to set it as a secret.
fly secrets set DB_USERNAME=your-username DB_PASSWORD=your-password
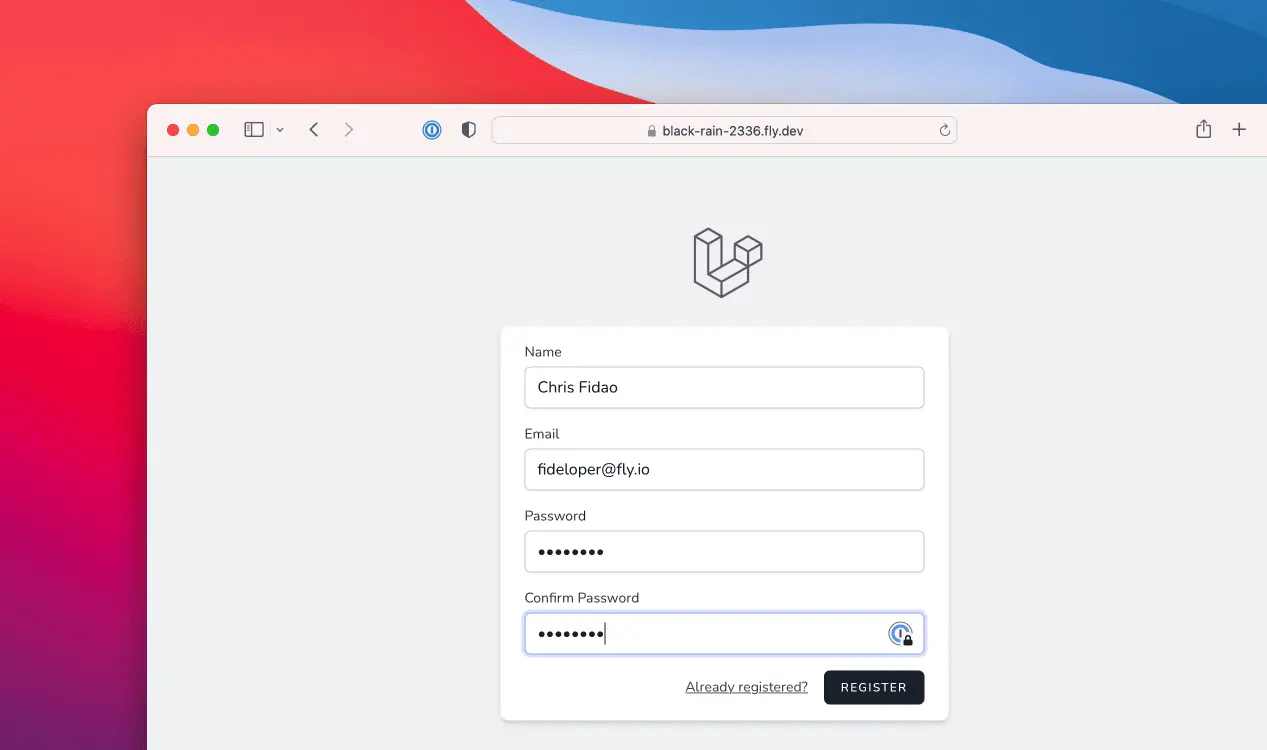
Authentication with Laravel Breeze
Many Laravel apps will have user authentication. Let’s use Laravel Breeze to quickly scaffold auth into our app.
cd ~/Fly/laravel-fly

composer require laravel/breeze --dev

php artisan breeze:install

# If you're running your app locally
# you'll want to get static assets/run migrations
npm install
npm run dev

php artisan migrate
Check that it works locally if you’d like, then deploy it!
fly deploy
Did you know you can ssh into your apps? We’ll use that to run our migrations:
fly ssh console -C "php /var/www/html/artisan migrate --force"
Connecting to top1.nearest.of.black-rain-2336.internal... complete
Migration table created successfully.
Migrating: 2014_10_12_000000_create_users_table
Migrated:  2014_10_12_000000_create_users_table (216.52ms)
Migrating: 2014_10_12_100000_create_password_resets_table
Migrated:  2014_10_12_100000_create_password_resets_table (199.27ms)
Migrating: 2019_08_19_000000_create_failed_jobs_table
Migrated:  2019_08_19_000000_create_failed_jobs_table (197.86ms)
Migrating: 2019_12_14_000001_create_personal_access_tokens_table
Migrated:  2019_12_14_000001_create_personal_access_tokens_table (310.91ms)
Migrate on Deploy
If you’re wondering how to automate the running of your migrations, you’re in luck! That’s configurable in the deploy section of the fly.toml file.
The following will run your migrations just before making the latest version of the application available.
# File: fly.toml
[deploy]
  release_command = "php /var/www/html/artisan migrate --force"
Release commands run your latest code in their own VM just before making the actual application VM live. However the release command has no access to any attached volumes (we’re not using any volumes in our case here).
You should now be able to register and log in.
It works, we’ve got a full(ish) Laravel app running!
Cron and Queues
The fly launch command gave us some boilerplate to easily use Laravel’s scheduler (cron) and queue workers.
To enable those, we can configure some processes in our fly.toml file. Add the following:
[processes]
  # Yes, this should be an empty string
  app = ""
  cron = "cron -f"
  worker = "php artisan queue:listen"
You may need to do further configuration to your queue worker (setting the driver).
Don’t forget to run fly deploy after making changes.
Be sure to check the docs on Laravel’s cron and queues to see more details, like how to scale them out separately. Lastly, note that each defined process runs in a separate VM.
Poke the Bear
Let’s see what’s going on in our VM. We can use the logs command to see what’s going on behind the scenes, or the ssh command to poke around!
# From our laravel app directory
# (where fly.toml is)
cd ~/Fly/laravel-fly

# See some logs!
fly logs

# SSH and interact with the VM!
fly ssh console

# We can see that our php-fpm, queue, and cron daemons are running:
> ps aux | grep [f]pm
> ps aux | grep [q]ueue
> ps aux | grep [c]ron
What We Did
We have a Laravel application running with all the usual things:
- MySQL
- Redis
- cron (for the scheduler)
- Queues
That covers the most popular use cases for Laravel, but there’s lots more you can do as well! My favorite part of this is how easy it is to setup extra services in Fly (Redis in our case). The private networking makes it super easy.
Fly is working on making database integrations easier as well. Keep an eye out for managed MySQL via PlanetScale. You can see how to take your app global with Planetscale here.