

In just a few steps, deploy your Laravel application on Fly.io, you’ll be up and running in minutes!
Need to run a Laravel backend along with a React frontend? That’s going to be a piece of cake with Inertia! Inertia allows us to work in both monolithic Laravel land, and our preferred (Inertia-supported) frontend framework or library.
What’s more, we can pre-render HTML pages on the server with Inertia’s Server Side Rendering support. This will help in improving initial page load of our Laravel-Inertia SPA app, and help our website become SEO-friendly.
And the cake on top? It’s super easy to set up on Fly.io!
Setting Up
The easiest way to set up a Laravel project with Inertia is through Laravel’s starter kits. Today, we’ll use the Breeze starter kit to quickly set up Laravel with React and Server Side Rendering.
Make sure you’re in your Laravel project’s directory, and run the following commands to set it up with Breeze and Inertia SSR for React:
# Get breeze
composer require laravel/breeze --dev

# Install with React and SSR
php artisan breeze:install react --ssr
Running the last command above should scaffold necessary Breeze, React, and Inertia SSR settings into our project. But of course, we can still manually install Inertia SSR into our project by following instructions in the official docs.
With our Laravel app properly configured, we can now run php artisan serve for the backend, and npm run dev for the frontend. When we visit our site, we should see the default landing page for Breeze-scaffolded apps. And, if we right click on the page, click on “Inspect”, and navigate to the Console tab in the browser’s inspection window, we’ll see clear as day: React’s message on the console window:
 Amazing! Thanks to Breeze’s Inertia Scaffolding, we now have a Laravel application scaffolded with Breeze’s authentication layer and React plugged in for its view layer—in just a few commands!
React
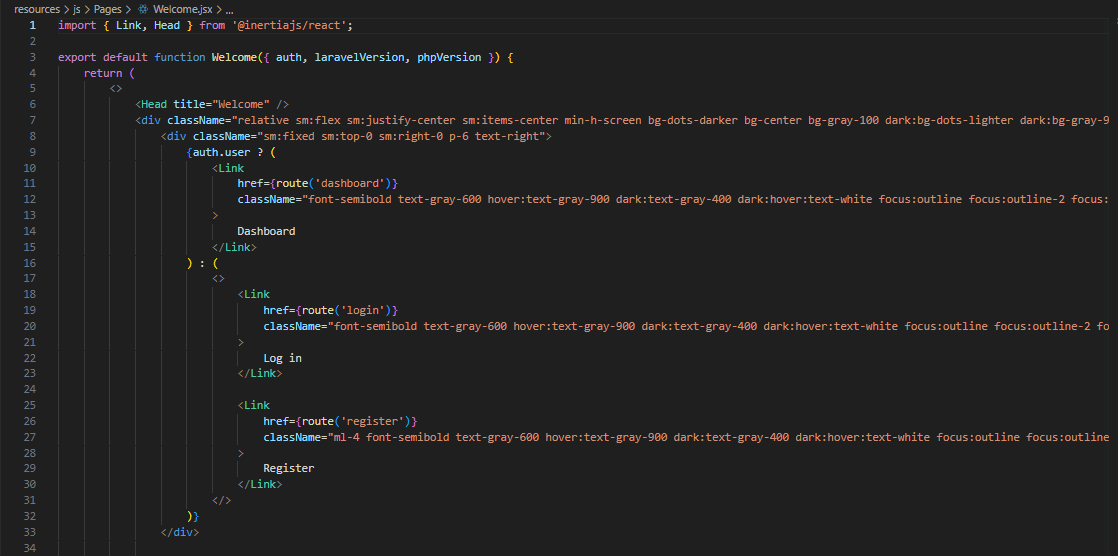
Let’s make sure we’re not dreaming, and edit this landing page, React style. If we would inspect the landing route declared in routes/web.php, we would notice that it returns this snippet:
Route::get('/', function () {
    return Inertia::render('Welcome', [
        'canLogin' => Route::has('login'),
        'canRegister' => Route::has('register'),
        'laravelVersion' => Application::VERSION,
        'phpVersion' => PHP_VERSION,
    ]);
});
See, every page in an Inertia application would have a corresponding route, and JavaScript component. Controllers can be substituted with closures, just like above.
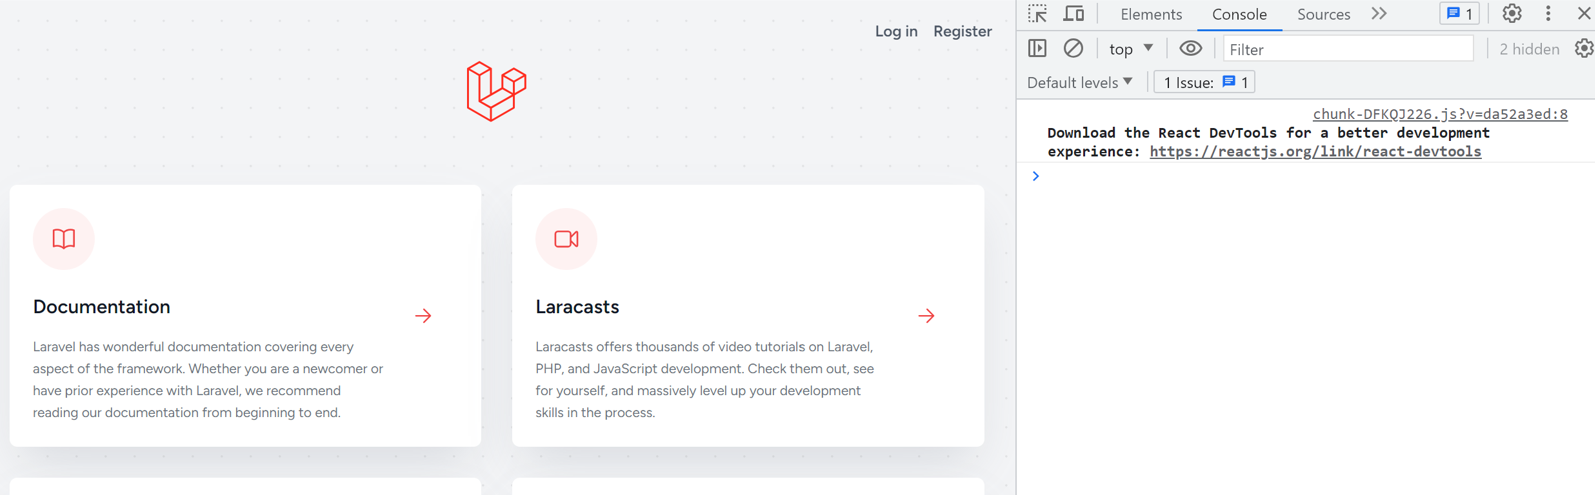
The “/” route renders a Welcome JavaScript component, which we can see full picture in resources/js/Pages/Welcome.jsx. Open it, and lo and be amazed—
 A full, “Welcome”, React component! In our Laravel app. That’s just, amaahy-ziing(!)—what else can be said? Except, maybe, nothing. Just appreciative silence(wonderment), for this React powered, Laravel welcome page:
Plugging a React Component
Moving away from basking at the brilliance of the experience above, let’s make our first change to our Laravel-React, Inertia bridged app.
Create a React component, resources/js/Page/Inspire.jsx, which will display inspiring quotes to visitors to our website:
{/* resources/js/Page/Inspire.jsx */}

export default function Inspire( {quote} ) {
    return (
      <h1 className="flex justify-center">
         {quote}
      </h1>
    )
}
Plug this in the Welcome page, just under the Laravel logo:
{/* resources/js/Page/Welcome.jsx */}

+ import Inspire from './Inspire';

export default function Welcome({ auth, laravelVersion, phpVersion }) {
  {/* Other snippet above the Logo here */}

  {/* Laravel Logo snippet here */}

+  <Inspire />
Notice however, our Inspire React function waits for a quote prop to be passed to it?
To handle this expectation, pass a $quote variable from our Laravel closure:
/* routes/web.php */
Route::get('/', function () {
    return Inertia::render('Welcome', [
+       'quote' => strip_tags(\Illuminate\Foundation\Inspiring::quote()),
        'canLogin' => Route::has('login'),
        'canRegister' => Route::has('register'),
        'laravelVersion' => Application::VERSION,
        'phpVersion' => PHP_VERSION,
    ]);
});
And receive this quote props in both the Welcome and Inspire React components:
{/* resources/js/Page/Welcome.jsx */}
+ export default function Welcome({ ..., quote }) {

    {/* Other snippet above inspire here */}

+   <Inspire quote={quote}/>
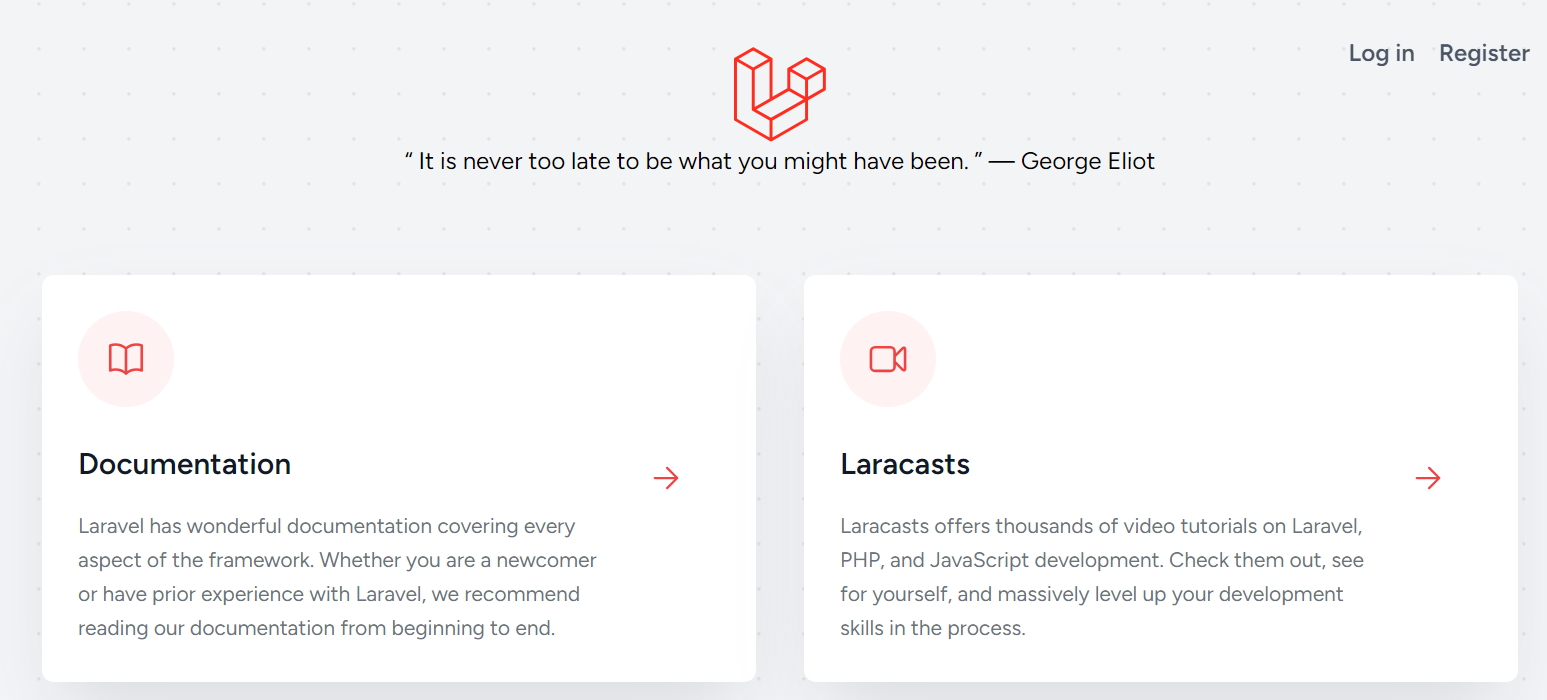
And so, with the Illuminate\Foundation\Inspiring package, and our plugged Inspire React component, our users may now view inspiring quotes on every visit:
Inertia SPA
Let’s rewind a little bit, step away from Laravel and React, and come back to Inertia. Huddle closer to the screen, right click somewhere on the current page, and click “View page source”. Then, search for “Laravel News” in the page source.
And notice, it’s…not there. Weird! There is definitely a “Laravel News” card in the welcome page if we go back to it—so, what is happening here?

To make sense of this sorcery, let’s look into Inertia’s protocol. See, first requests to an Inertia page would return an HTML document which contains a specific, data-page attribute. This contains a JSON encoded page-object, which Inertia uses to completely render the initial page content.
That’s right. Initially, our HTML page is not yet fully complete. Inertia by default relies on client-side rendering in showing our app’s pages.
This is the reason the page source we inspected earlier did not contain our expected string. The page source only contained partial HTML content sent from the server, along with Inertia’s trustworthy data-page metadata.
It was the client-side renderer in the browser, which is tasked into rendering the page’s content, that created the full content for us to see later on.
Inertia SSR
This initially incomplete content on our page can hurt our website’s SEO friendliness. Some search engines will only read the initial page content, while others would only wait a few seconds for remaining content to render before it leaves. This results in search engines missing content keywords useful for making our website more relevant in search engine results.
In order to improve our Laravel website’s SEO friendliness, Inertia provides us a means to instead render the full HTML content from the server, instead of the client. And this is through the use of its Inertia Server-Side Rendering support.
Earlier above, we did scaffold our application with the necessary command to enable Inertia SSR for our application. But, we missed one important step, which is running Inertia’s SSR server with:
php artisan inertia:start-ssr
Running the above command will start the Node process in our server. This SSR server will from then on handle fully rendering html content, that it will pass back to the client. So, notice now, once the SSR server starts running, we receive fully-complete, rendered HTML in our page source:
# Before starting SSR server
curl localhost:8000 | grep "Laravel News"
# Nothing found

# After starting SSR server
curl localhost:8000 | grep "Laravel News"
# We find some HTML
Flying on Fly.io
So, what are you waiting for? Run your Laravel React app with Inertia SSR—go on!
In fact, going from local to cloud with your Laravel-React, Inertia bridged app is a breeze in Fly.io. We even have a whole page for it in Fly.io. The steps are so easy, that we can even deploy our app, right here, right now!
Fly.io ❤️ Laravel
Fly your servers close to your users—and marvel at the speed of close proximity. Deploy globally on Fly in minutes!
Deploy your Laravel app! →
First things first, install the flytcl command. Then access your account in your work environment either with a sign up with fly auth signup, or login fly auth login.
Next, in your Laravel project directory, run fly launch. Go through the prompts for details for your new Fly.io app ( app name, region to deploy, etc… ). But don’t deploy the app yet.
fly launch will scaffold files in your Laravel directory that will be used to deploy it on Fly.io. You’ll then need to make three general changes from there to successfully set up and deploy your app:
Revise the generated Dockerfile to include
Nodein the final image:Inertia requires Node to run its SSR renderer, so revise the
Dockerfileto include Node on the final image. Revise the Dockerfile to install Node under thefly-laravelimage:# Install node under fly-laravel image + RUN cd ~ \ + && curl -sL https://deb.nodesource.com/setup_18.x -o nodesource_setup.sh \ + && bash nodesource_setup.sh \ + && apt install nodejs \ + && cd /var/www/htmlAs you might notice however, there is already a section in the generated Dockerfile where a
FROM nodedeclaration is made. ThisFromdeclaration is part of the Dockerfile’s multi-stage build setup in order to make use of Node in building static assets, but to not includeNodein the final image created.Since Node is needed in the final image to be created by the Dockerfile, and is included in the final image thanks to the revision above, you can now remove this multi-stage build set up:
# REMOVE multi-stage build :
- FROM node:${NODE_VERSION} as node_modules_go_brrr
- RUN mkdir /app
- RUN mkdir -p  /app
- WORKDIR /app
- COPY . .
- COPY --from=base /var/www/html/vendor /app/vendor

# Also remove copying files between previously available Node image to final base image:
- FROM base
- COPY --from=node_modules_go_brrr /app/public /var/www/html/public-npm
- RUN rsync -ar /var/www/html/public-npm/ /var/www/html/public/ \
-     && rm -rf /var/www/html/public-npm \
-     && chown -R www-data:www-data /var/www/html/public

EXPOSE 8080

ENTRYPOINT ["/entrypoint"]
Revise
fly.tomlto create a new process group to run the Inertia SSR server, and include an [env] variable that points to its address:With Node available in the final image generated from the Dockerfile above, you can now run Inertia’s Node-based SSR server. In this set up, you’ll create a new Fly process group which would be dedicated to running this SSR server.
To include a new process group in your Fly app, revise the configuration file generated, “fly.toml”, and include a new process group ( you can call this
ssr) which will run Inertia’s SSR server:# Include ssr process group aside from default app process group: + [processes] + app="" + ssr="php /var/www/html/artisan inertia:start-ssr" # Make sure to include a needed processes value for the section below: [http_service] internal_port = 8080 force_https = true auto_stop_machines = true auto_start_machines = true min_machines_running = 0 + processes=["app"]Creating a separate process group for your Inertia SSR server means running its own set of Fly Machine(s) separate from your Laravel web app’s set of Fly Machine(s). This means that you’ll need to set up communication between the Machine(s) running your Laravel web server, and the Machine(s) running your Inertia’s SSR server.
The Machine(s) running your Laravel web server can talk to the Machine(s) running your Inertia SSR server through .internal address. We can include this address in the
fly.tomlfile by adding an[env]variable pointing to thessr‘s .internal address, at its proper port:[env] APP_ENV = "production" LOG_CHANNEL = "stderr" LOG_LEVEL = "info" LOG_STDERR_FORMATTER = "Monolog\\Formatter\\JsonFormatter" SESSION_DRIVER = "cookie" SESSION_SECURE_COOKIE = "true" + SSR_URL="ssr.process.<yourAppNameHerePlease>.internal:13714"Revise
config/inertia.phpto point the ssr url to theSSR_URLvariable configured:With SSR’s .internal address available in your env, you can now use this to update the configured SSR url used by Laravel. Pull the
config/inertia.phpfile into your Laravel directory, and revise the value for the ssr url:'ssr' => [ 'enabled' => true, + 'url' => env('SSR_URL', 'http://127.0.0.1:13714'),Once done with all the changes above, go on, and deploy your app with:
fly deploy.
Great Job!
Truly, in this article, we saw how delightfully easy it is to bridge Laravel and React with Inertia—how much of a breeze it is to deploy with Fly.io.
And now, you should have your very own, SEO-friendly, Inertia-SSR powered( in a separate Machine from your ), Laravel-React app, flying on Fly.io—great job!