

In this post we offload the work from our application and run async tasks using Celery workers on Fly Machines. Django on Fly.io is pretty sweet! Check it out: you can be up and running on Fly.io in just minutes.
It’s time… We are finally talking Celery! 🎉
We’ve been discussing about performance improvements: strategies to reduce the load on the database by caching our app and taking advantage of the async support to run tasks concurrently with async views to name a few.
However, there is a point where the improvements are not enough anymore:
- What if we have tasks to be performed but one or more of them take too long?
- Long-running tasks: when dealing with tasks that might take a long time to complete without affecting the responsiveness of the application.
- What if one of the tasks depend on an external API we have no control of?
- Integrating external services: when we want to integrate with external services and need a robust solution to handle communication asynchronous.
- What if many things can go wrong and we need to make sure retries are done and any problems are notified?
- Retry mechanism: when we want to implement automatic task retrying in case of failures or temporary errors, improving the task reliability.
These are just a few examples when we need to start thinking out of the box. 📦
It’s time to introduce you to Celery!
Enter Celery…
Celery is an open-source distributed task queue. And what does that mean?
Task can mean a lot of things… In this context, a task generally refers to the smallest unit of work in Celery.
The role of a task queue is to allow us to offload the work - here referred as a task - to another process to be handled asynchronously in the background. Once the task is sent to the queue, no “awaiting” is needed to complete the request/response cycle or proceed to other tasks, thus not blocking the main application flow.
In particular, Celery enables the execution of tasks in a distributed manner, across multiple machines or worker processes, which helps improve the performance and scalability of our applications.
It uses the producer/consumer model. In this model, tasks are generated by the application (producer), sent to a queue (broker) and finally processed by the worker processes (consumer):
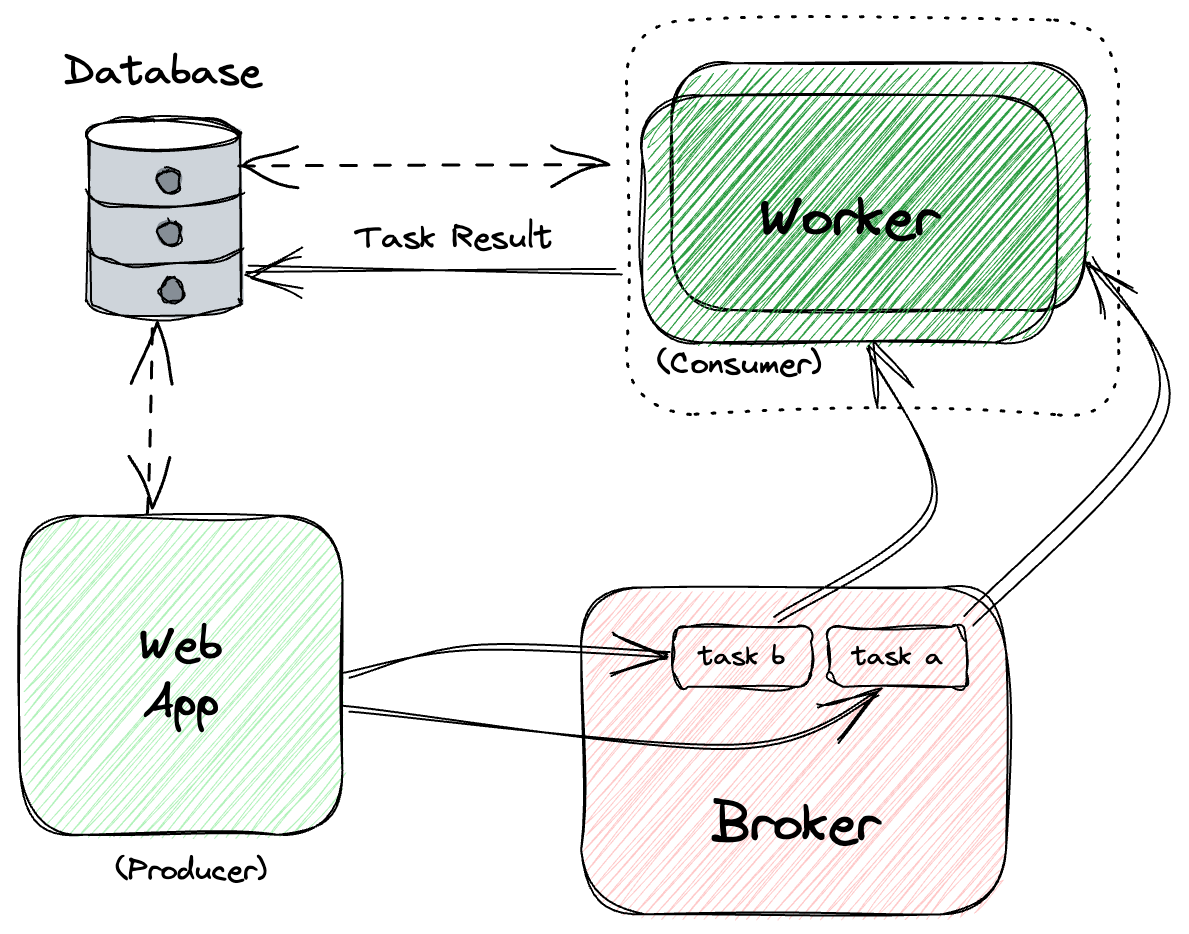
In a high-level: when a task is called, our application sends a message to the broker containing the task details. The message is then added the a queue in the broker, awaiting execution. The worker(s) monitors the broker for new tasks and when a worker is free and ready to process a new task, it requests a task from the broker. When the broker receives the request from the worker, it provides it with the next task to be executed.
It’s important to emphasize that the worker executes the task independently from the main application, allowing the main application to proceed with other requests.
The worker(s) can perform operations on the database if needed. Once the task is completed, the worker updates the task status and result. If necessary, the result of the task can be stored.
Backend and Brokers
Brokers serve as a message transport. It enables the communication between producers and consumers. They act as a centralized hub where tasks are stored and can be accessed by the consumers.
At the time of writing, Celery supports RabbitMQ, Redis and Amazon SQS as brokers. Redis performs well for high-speed delivery of small messages. On the flip side, RabbitMQ can handle larger messages than Redis. However, if there is a high influx of messages, you should consider scaling by using Redis or SQS - unless RabbitMQ is running at a very large scale.
Redis and RabbitMQ can also be used as a backend to store the results. Other than that, SQLAlchemy is another option which allows Celery to interface with MySQL, PostgreSQL, SQLite, and more. That’s how Celery can use a SQL database as a result backend.
Due to a lack of resources, Windows is no longer supported since Celery 4.x. In this case, it’s suggested to use other task queues such as huey or Dramatiq.
If you decide to try this out on Windows anyways, share your experience with us on the Fly.io community. I’d love to hear from you!
Since Windows support is not guaranteed, this guide mainly focuses on Unix Systems.
Django ❤️ Celery
Why did we choose Celery?
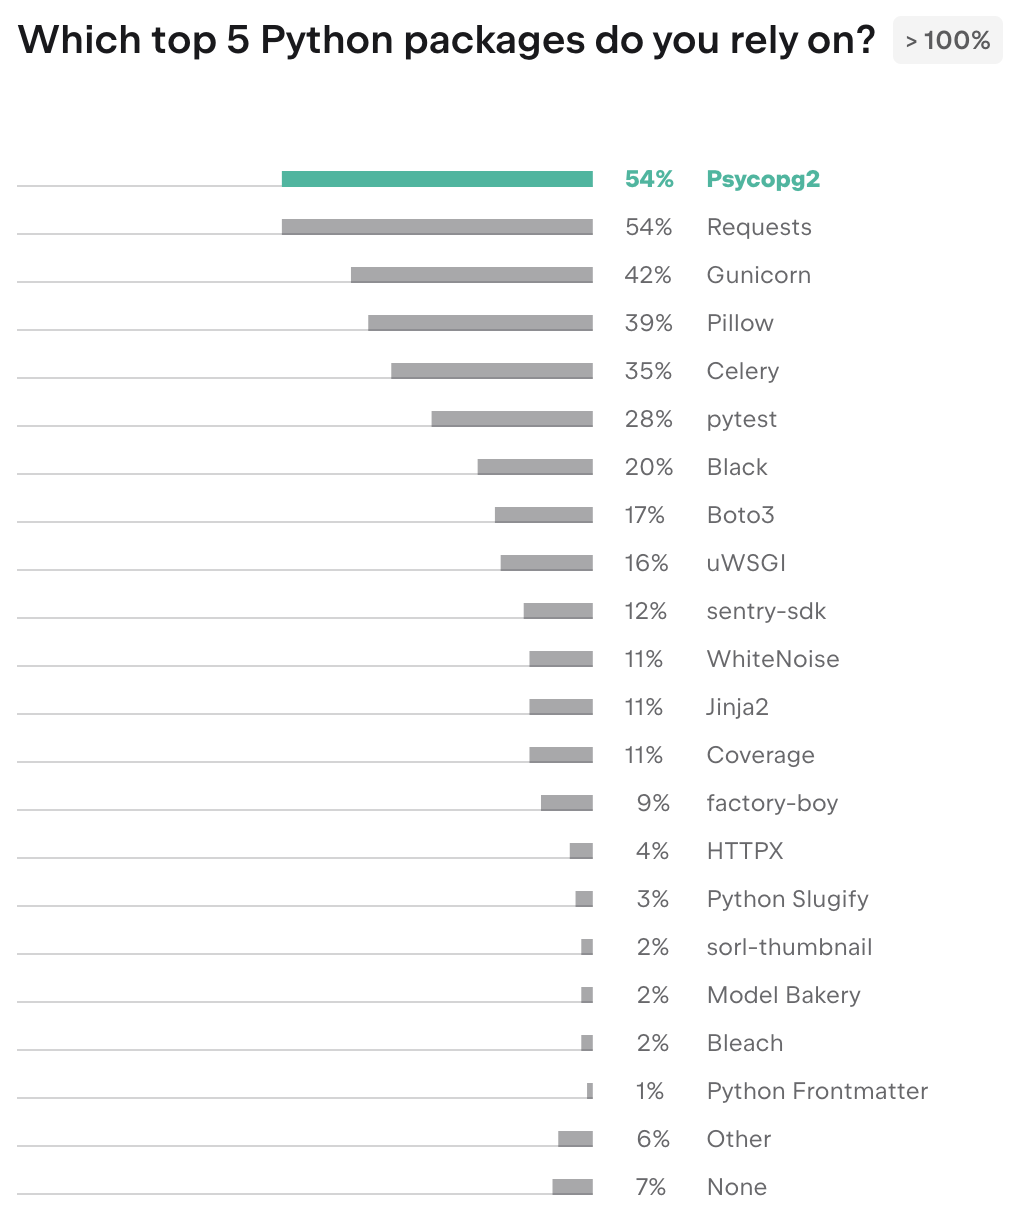
Since Celery 3.1, Django is supported out of the box without the need for an external library. So, it comes as no surprise that, according to the Django Developers Survey 2022, 35% of the Django users rely on Celery. Besides that, 27% of them consider django-celery one of their favorite third-party Django packages. This package had its last release back in 2016 and it was the old way to integrate Celery with Django.
Buckle up, because Celery is the star ⭐ of today’s article. But first… Let’s uncover our practical application.
Our Application 📰
Let’s say we want to implement an RSS Feed Reader application that aggregates syndicated web content (in which content is made available from one website to other websites) such as we have for this Blog: https://fly.io/django-beats/feed.xml
<feed xmlns="http://www.w3.org/2005/Atom">
<title>Django Beats</title>
<subtitle>Articles on all things Django from the Team at Fly.io</subtitle>
<id>https://fly.io/</id>
<link href="https://fly.io/"/>
<link href="https://fly.io/django-beats/feed.xml" rel="self"/>
<updated>2023-07-03T00:00:00+00:00</updated>
<author>
<name>Fly</name>
</author>
<entry>
...
</entry>
We won’t get into the details of how this works, but Django comes with a high-level syndication-feed-generating framework for creating RSS and Atom feeds, in case you are interested in implementing your own feed.
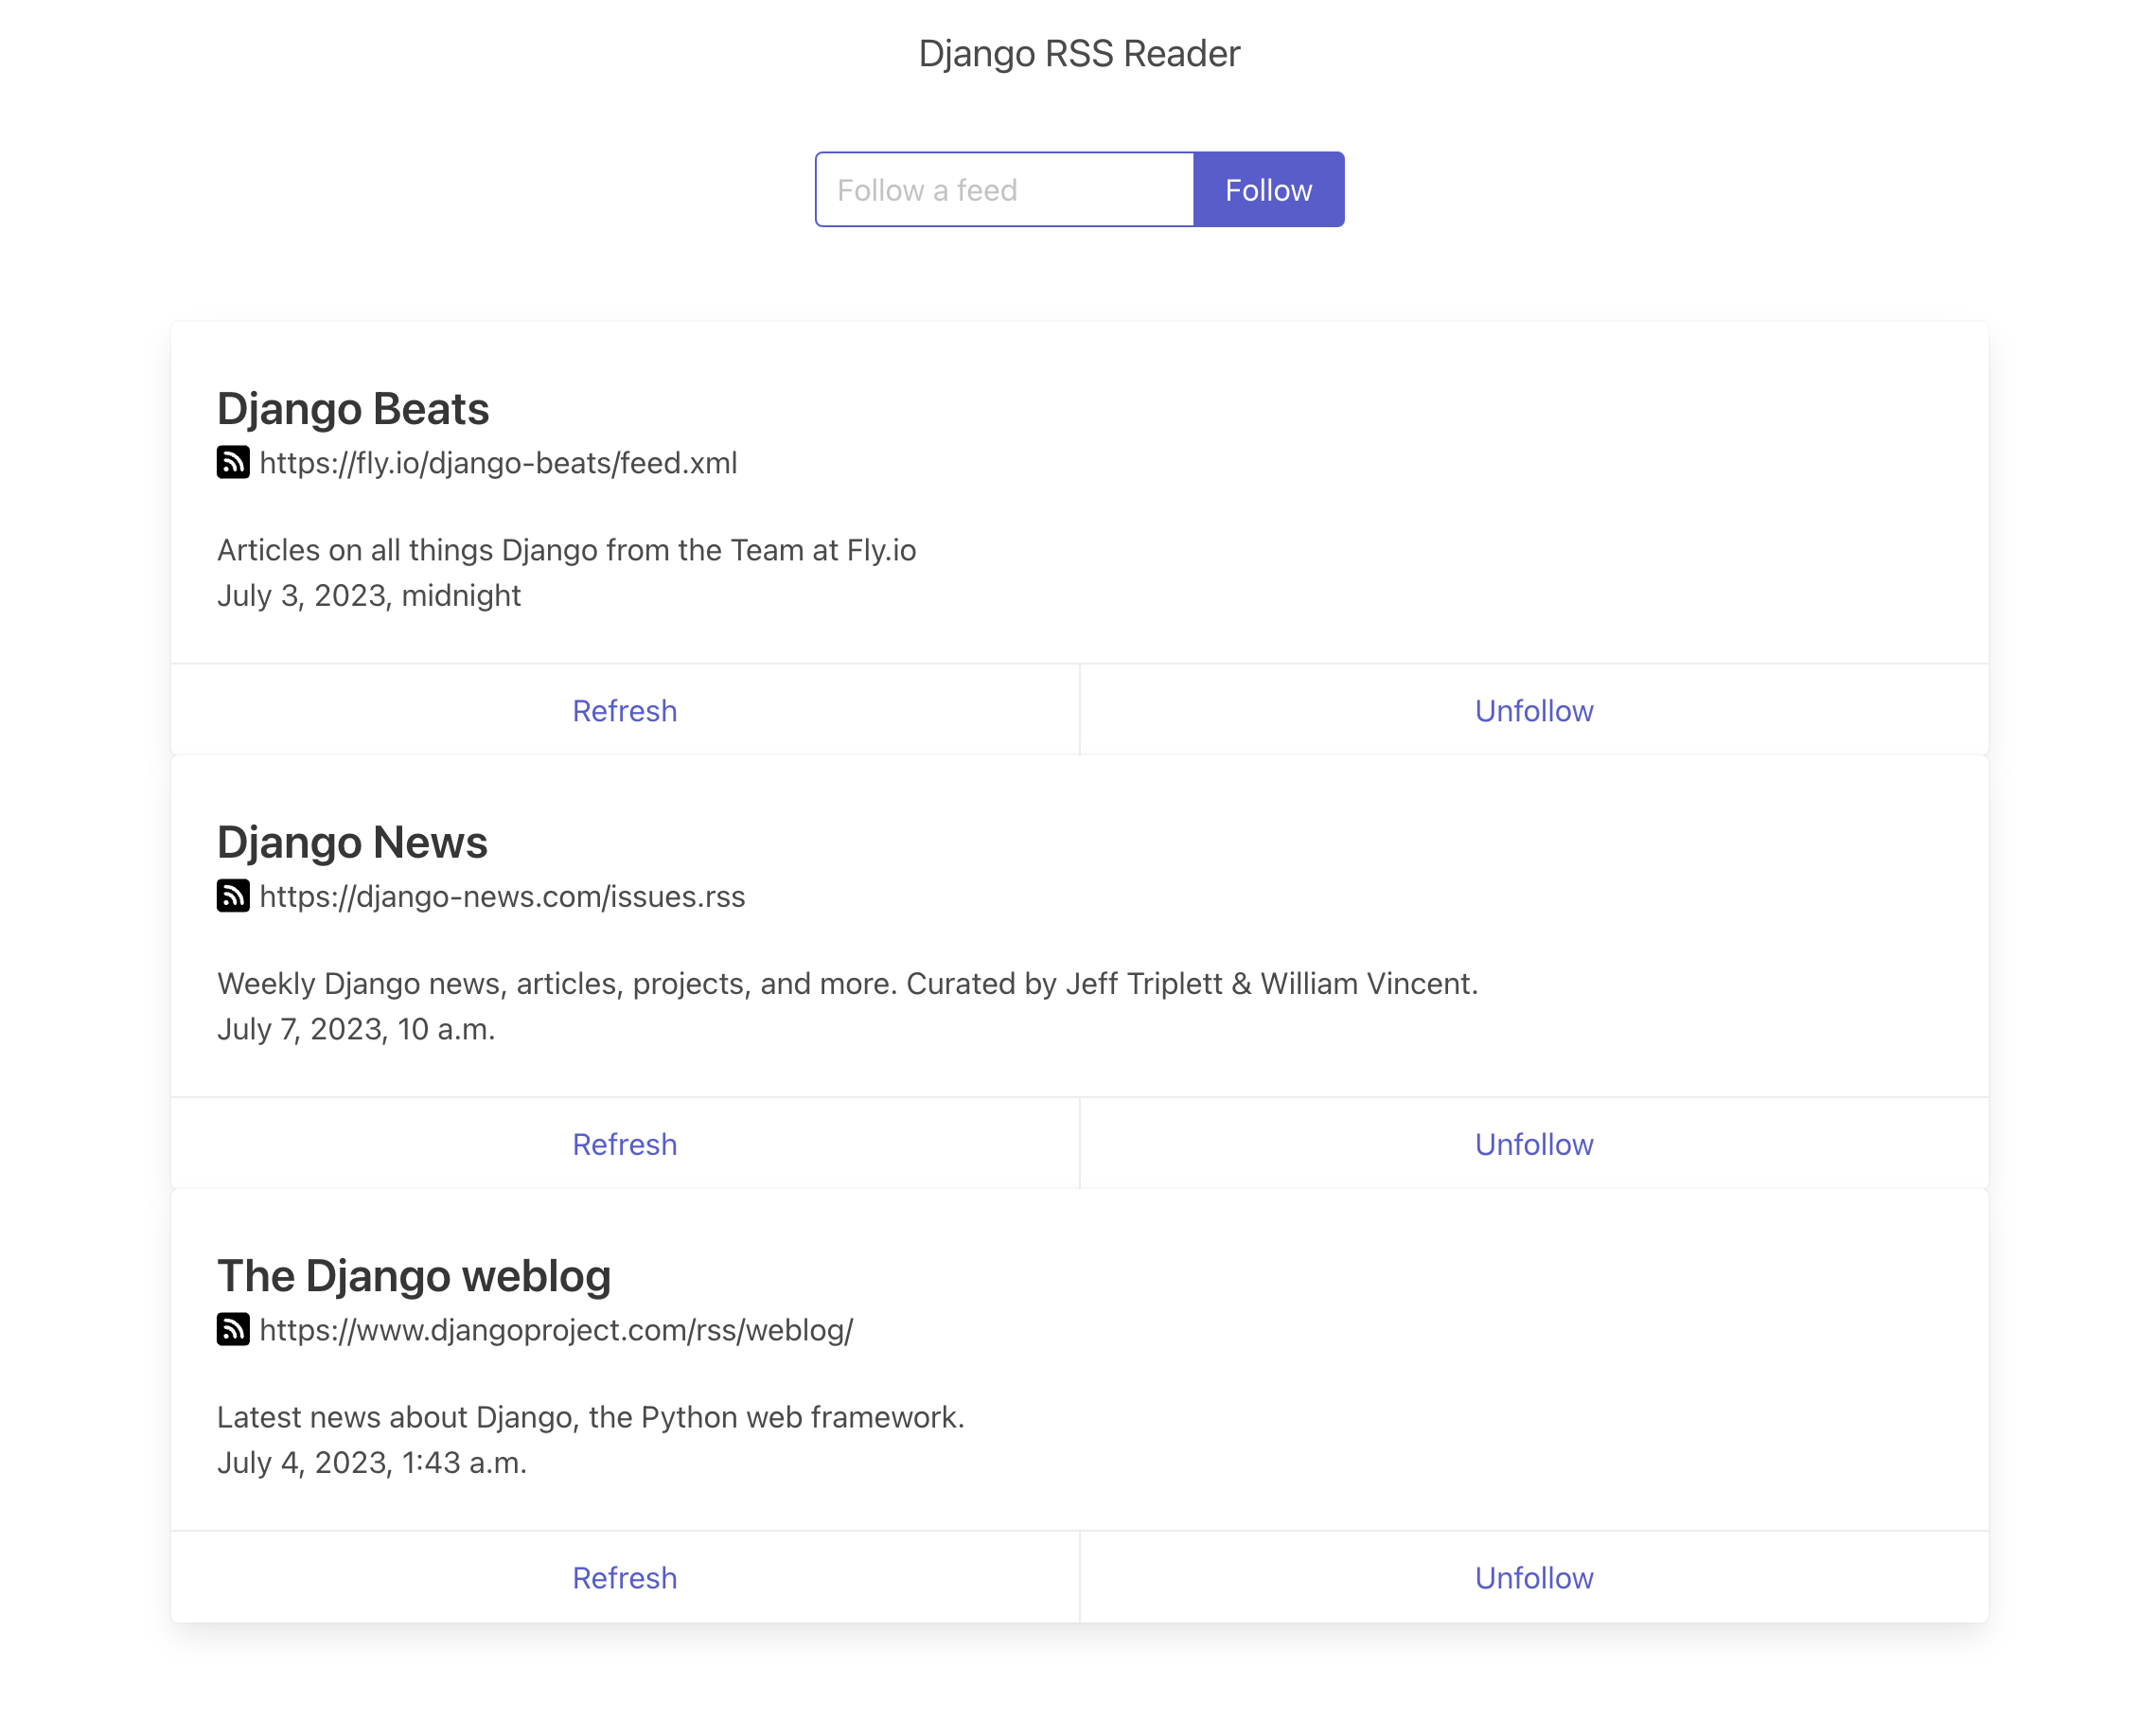
We can follow or unfollow RSS feeds, access the feeds and manually refresh it to retrieve the latest updates.
When a new feed is added, we want to parse, create and add the feed to our database. Accessing the feed from an external website might take a few seconds - or even minutes ⏳ In addition, the external source might be down! We might need to try a few times to get it right until we realize we need to display an error to the user. In the meantime, we don’t want the user’s browser to be waiting for those tasks to be finished.
That’s a good use-case for taking advantage of a task queue. In this case, we offload the work to fetch and create all the necessary data to another process and free our main process to continue processing other requests. It’s a win-win situation! 🏅
That’s a high-level implementation of our application:
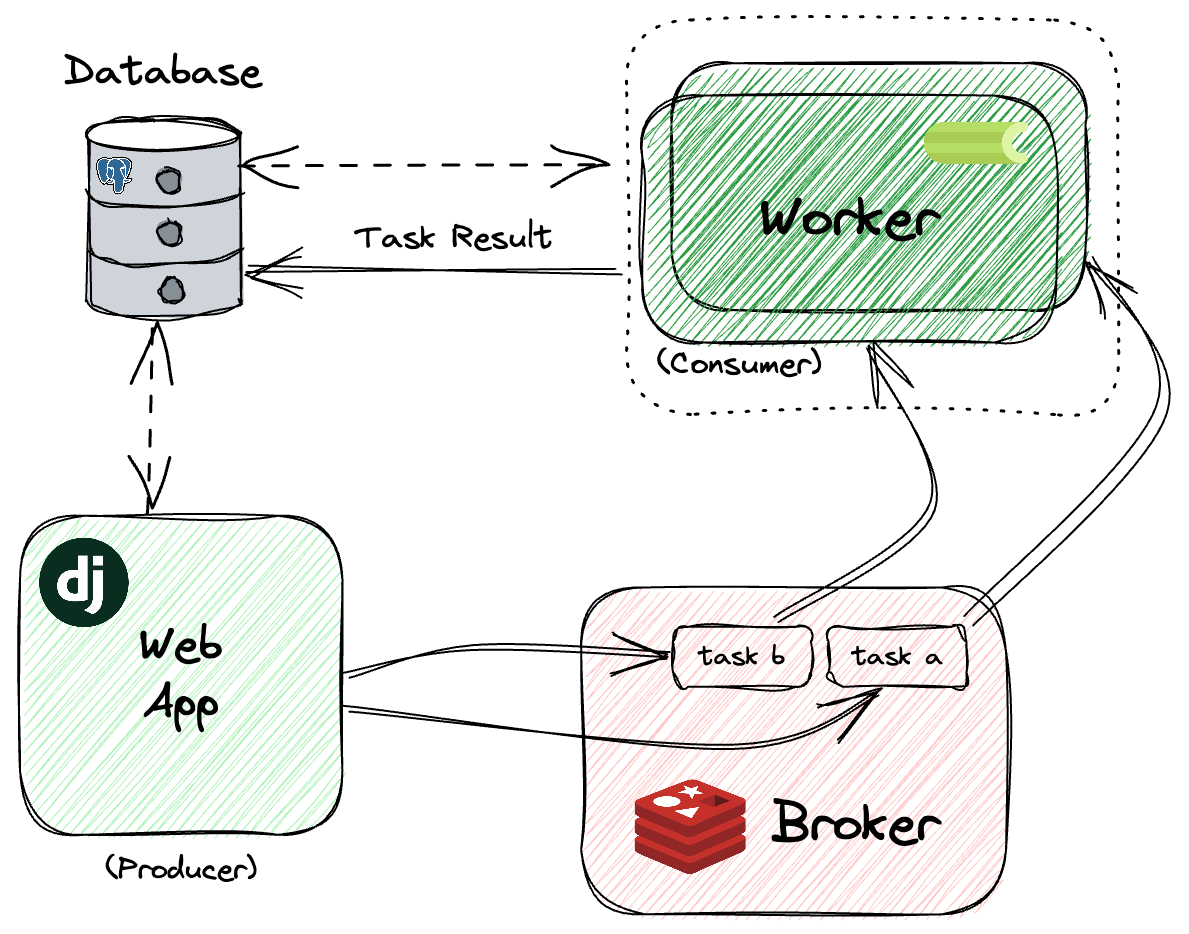
Our Django app serves as a producer and creates a task to be performed when we need to parse a new feed. We’ll use Redis as our broker, where the tasks will be transported. Celery is our consumer, waiting for new tasks to be executed. Those workers fetch the tasks and store the results to our PostgreSQL database.
As mentioned before, there are a few options where we can store the results. For our example, we are storing the results on PostgreSQL to make it easier to visualize the results via the Django Admin - and for our example there is no need in separating the data.
So, shall we start at the beginning?
Setting Up 🛠
Let’s start by installing celery with redis support by using the bundle:
python3 -m pip install "celery[redis]"
celery 5.3.1 and redis 4.6.0 are used in this guide.
This command installs celery and the dependencies for redis in one go to use Redis as a message transport or as a result backend.
Consider a default Django project structure like this:
- proj/
  - app/
    - __init__.py
    - ...
  - manage.py
  - proj/
    - __init__.py
    - settings.py
    - urls.py
For our example, the structure looks like:
- django-rss-feed-reader/
  - rss_feed/
    - __init__.py
    - ...
  - manage.py
  - rss_feed_reader/
    - __init__.py
    - settings.py
    - urls.py
Let’s first define an instance of Celery, here called app. It’s recommended to create a new celery.py file in your project’s folder:
# <proj>/<proj>/celery.py
# django-rss-feed-reader/rss_feed_reader/celery.py
import os

from celery import Celery

# set the default Django settings module for the 'celery' program
os.environ.setdefault("DJANGO_SETTINGS_MODULE", "rss_feed_reader.settings")

app = Celery("rss_feed_reader")

# all celery-related configuration keys should have a `CELERY_` prefix
app.config_from_object("django.conf:settings", namespace="CELERY")
# load task modules from all registered Django apps
app.autodiscover_tasks()
It’s necessary to import this app in your <proj>/__init__.py to ensure we initialized the celery package when Django starts:
# <proj>/<proj>/__init__.py
# django-rss-feed-reader/rss_feed_reader/__init__.py
from .celery import app as celery_app


__all__ = ("celery_app",)
The basic config is done. Let’s create the task.
In the <app> module where we want to perform the async task, let’s create a new <app>/tasks.py file to implement a very simplified version of our task:
# <proj>/<app>/tasks.py
# django-rss-feed-reader/rss_feed/tasks.py
import feedparser
from celery import shared_task
from celery.utils.log import get_task_logger
from django.apps import apps

from rss_feed.exceptions import ScrapeRSSFeedFailException

logging = get_task_logger(__name__)


@shared_task(
    bind=True,
    autoretry_for=(ScrapeRSSFeedFailException,),
    retry_backoff=3,
    retry_kwargs={
        "max_retries": 5,
    },
)
def rss_feed_scrape_task(self, feed_id):
    """Scrape and parse the RSS feeds."""
    Feed = apps.get_model("rss_feed", "Feed")
    feed_obj = Feed.objects.get(id=feed_id)

    if self.request.retries > 0:  # Only when retrying
        logging.info(
            "[Task Retry] Attempt %d/%d",
            self.request.retries,
            self.retry_kwargs["max_retries"],
        )
    logging.info("[Started] Scraping data from %s ....", feed_obj.url)
    parsed_feed_dict = feedparser.parse(feed.url)
    if parsed_feed_dict.bozo:
        raise ScrapeRSSFeedFailException(parsed_feed_dict.bozo_exception)
    # ...
    # Code to parse our feed and update "feed_obj"
    # ...
    logging.info("[Finished] Data from %s was scraped.", feed_obj.url)
Note that here we need to use the @shared_task decorator instead of @app.task.
Why do we use @shared_task instead of @app.task, you might ask me?
Our app module (also referred as a reusable app) can’t depend on the project itself, where the app instance is instantiated (celery.py). So, it’s not possible to import the app directly. @shared_task is a way to create tasks without having the app instance.
bind=True: when set toTrue, it turns the task into a bound task method, giving it access to the task instance itself as its first argument (self) - that’s why we have access toself.request.retriesandself.retry_kwargs.autoretry_for=(ScrapeRSSFeedFailException,): specify the exceptions for which the task should be automatically retried if they are raised during task execution. You can use your own custom exceptions.retry_backoff=3: enable or disable exponential backoff behaviour during task retries. Exponential backoff is a technique used in retry mechanisms where the delay between consecutive retries increases after each attempt. This approach can prevent overwhelming the system with frequent retries and allow potential transient failures to resolve before retrying the task. When it’s set to a number, like3, the value is used a delay factor: the first retry will delay 3 seconds, the second will delay 6 seconds, the third will delay 12 seconds, the fourth will delay 24 seconds, and so on. Ifretry_backoff=Trueit follows the rules of exponential backoff: the first retry will have a delay of 1 second, the second retry will have a delay of 2 seconds, the third will delay 4 seconds, the fourth will delay 8 seconds, and so on. Important: This behaviour only happens ifretry_jitteris explicitly set toFalse. Otherwise,retry_jitterintroduces randomness into exponential backoff delays and prevent all tasks in the queue from being executed simultaneously. The delay will be a random number between zero and the delay value calculated by theretry_backoff. By default,retry_jitter=True.retry_kwargs: used to specify custom arguments for an internal retry."max_retries": 5: the maximum number of retries before giving up. Celery will raise an exception after 5 failed attempts.
These are just a few option, you can find the list of options here.
Now that the setting up us done, let’s start our Django server:
python3 manage.py runserver
Running Redis Locally
If you don’t have Redis installed, you can do so by running:
# For macOS
brew install redis
# For Linux
sudo apt-get install redis
For Windows: Redis is not officially supported on Windows, but you can follow these steps to install Redis for development.
Let’s start the redis process in the background:
- For macOS via Homebrew:
brew services start redis
- For Linux/Windows:
sudo service redis-server start
By default, the Redis server runs at the address 127.0.0.1 (or localhost) on the TCP port 6379.
Everything is up and running! Let’s prepare our app to use Redis as a broker.
Configuration
Let’s set the environment variable CELERY_BROKER_URL :
# <proj>/<proj>/settings.py
# django-rss-feed-reader/rss_feed_reader/settings.py
CELERY_BROKER_URL = env.str("REDIS_URL", "redis://localhost:6379/")
We are using django-environ to store the configuration to be loaded at runtime. This is a good practice for our deployment. You can read more about it here.
Now that the broker - responsible for the transportation of our tasks - is running, let’s check how we can to spawn the Celery worker in another process.
Running Celery Worker Server Locally
To start our worker in a new process locally, let’s open a new terminal. We can now start our worker server by running:
celery -A rss_feed_reader worker -l info
 -------------- celery@Katias-Air v5.3.1 (emerald-rush)
--- ***** -----
-- ******* ---- macOS-13.5-arm64-arm-64bit 2023-07-28 13:20:44
- *** --- * ---
- ** ---------- [config]
- ** ---------- .> app:         rss_feed_reader:0x103b544d0
- ** ---------- .> transport:   redis://localhost:6379//
- ** ---------- .> results:
- *** --- * --- .> concurrency: 8 (prefork)
-- ******* ---- .> task events: OFF (enable -E to monitor tasks in this worker)
--- ***** -----
 -------------- [queues]
                .> celery           exchange=celery(direct) key=celery


[tasks]
  . rss_feed.tasks.rss_feed_scrape_task
Let’s break this down…
-A option specify the name of celery instance to use, in our case, rss_feed_reader. To refresh your memory, this was defined in the celery.py file by instantiating our Celery object:
app = Celery("rss_feed_reader")
We are also defining the log level as info using -l. This level determines the severity of the log message generated by the Celery workers. If not set, warning is the default level. If you remember our task, we used logging.info. This will make sure we will see our log output.
There are so many other options you can define, but those basic ones will do it today.
Our app, broker and worker are running! Let’s test it out, first via shell:
python3 manage.py shell
>>> from rss_feed.models import Feed
>>> from rss_feed.tasks import rss_feed_scrape_task
>>>
>>> feed = Feed(
...     url="https://fly.io/django-beats/feed.xml"
... )
>>> feed.save()
>>>
>>> rss_feed_task = rss_feed_scrape_task.delay(feed.id)
>>> rss_feed_task
<AsyncResult: 18a6d630-e3cf-4580-a10e-f19f64dd394c>
>>> rss_feed_task.status
'SUCCESS'
We create a new Feed object and pass the feed.id to the task. At this point, the task runs and we can check the status. All working fine!
Now, let’s simulate raising the exception on autoretry_for:
>>> from rss_feed.models import Feed
>>> from rss_feed.tasks import rss_feed_scrape_task
>>>
>>> feed = Feed(
...     url="http://feedparser.org/tests/illformed/rss/aaa_illformed.xml"
... )
>>> feed.save()
>>>
>>> rss_feed_task = rss_feed_scrape_task.delay(feed.id)
>>> rss_feed_task
<AsyncResult: d9910c1a-6e45-429d-b3bc-fc435974d51f>
>>> rss_feed_task.status
'RETRY'
>>> # a few seconds later...
>>> rss_feed_task.status
'FAILURE'
and evaluate the output:
[2023-08-11 14:26:41,735: INFO/MainProcess] Task rss_feed.tasks.rss_feed_scrape_task[d9910c1a-6e45-429d-b3bc-fc435974d51f] received
[2023-08-11 14:26:41,786: INFO/ForkPoolWorker-8] rss_feed.tasks.rss_feed_scrape_task[d9910c1a-6e45-429d-b3bc-fc435974d51f]: [Started] Scraping data from http://feedparser.org/tests/illformed/rss/aaa_illformed.xml ....
[2023-08-11 14:26:42,348: ERROR/ForkPoolWorker-8] rss_feed.tasks.rss_feed_scrape_task[d9910c1a-6e45-429d-b3bc-fc435974d51f]: <unknown>:2:0: syntax error
[2023-08-11 14:26:42,355: INFO/MainProcess] Task rss_feed.tasks.rss_feed_scrape_task[d9910c1a-6e45-429d-b3bc-fc435974d51f] received
[2023-08-11 14:26:42,366: INFO/ForkPoolWorker-8] Task rss_feed.tasks.rss_feed_scrape_task[d9910c1a-6e45-429d-b3bc-fc435974d51f] retry: Retry in 3s: ScrapeRSSFeedFailException(SAXParseException('syntax error'))
[2023-08-11 14:26:45,355: INFO/ForkPoolWorker-8] rss_feed.tasks.rss_feed_scrape_task[d9910c1a-6e45-429d-b3bc-fc435974d51f]: [Task Retry] Attempt 1/5
[2023-08-11 14:26:45,370: INFO/ForkPoolWorker-8] rss_feed.tasks.rss_feed_scrape_task[d9910c1a-6e45-429d-b3bc-fc435974d51f]: [Started] Scraping data from http://feedparser.org/tests/illformed/rss/aaa_illformed.xml ....
[2023-08-11 14:26:45,931: ERROR/ForkPoolWorker-8] rss_feed.tasks.rss_feed_scrape_task[d9910c1a-6e45-429d-b3bc-fc435974d51f]: <unknown>:2:0: syntax error
[2023-08-11 14:26:45,934: INFO/MainProcess] Task rss_feed.tasks.rss_feed_scrape_task[d9910c1a-6e45-429d-b3bc-fc435974d51f] received
[2023-08-11 14:26:45,941: INFO/ForkPoolWorker-8] Task rss_feed.tasks.rss_feed_scrape_task[d9910c1a-6e45-429d-b3bc-fc435974d51f] retry: Retry in 0s: ScrapeRSSFeedFailException(SAXParseException('syntax error'))
[2023-08-11 14:26:45,941: INFO/ForkPoolWorker-1] rss_feed.tasks.rss_feed_scrape_task[d9910c1a-6e45-429d-b3bc-fc435974d51f]: [Task Retry] Attempt 2/5
[2023-08-11 14:26:45,954: INFO/ForkPoolWorker-1] rss_feed.tasks.rss_feed_scrape_task[d9910c1a-6e45-429d-b3bc-fc435974d51f]: [Started] Scraping data from http://feedparser.org/tests/illformed/rss/aaa_illformed.xml ....
[2023-08-11 14:26:46,529: ERROR/ForkPoolWorker-1] rss_feed.tasks.rss_feed_scrape_task[d9910c1a-6e45-429d-b3bc-fc435974d51f]: <unknown>:2:0: syntax error
[2023-08-11 14:26:46,533: INFO/MainProcess] Task rss_feed.tasks.rss_feed_scrape_task[d9910c1a-6e45-429d-b3bc-fc435974d51f] received
[2023-08-11 14:26:46,541: INFO/ForkPoolWorker-1] Task rss_feed.tasks.rss_feed_scrape_task[d9910c1a-6e45-429d-b3bc-fc435974d51f] retry: Retry in 5s: ScrapeRSSFeedFailException(SAXParseException('syntax error'))
[2023-08-11 14:26:51,537: INFO/ForkPoolWorker-8] rss_feed.tasks.rss_feed_scrape_task[d9910c1a-6e45-429d-b3bc-fc435974d51f]: [Task Retry] Attempt 3/5
[2023-08-11 14:26:51,554: INFO/ForkPoolWorker-8] rss_feed.tasks.rss_feed_scrape_task[d9910c1a-6e45-429d-b3bc-fc435974d51f]: [Started] Scraping data from http://feedparser.org/tests/illformed/rss/aaa_illformed.xml ....
[2023-08-11 14:26:52,108: ERROR/ForkPoolWorker-8] rss_feed.tasks.rss_feed_scrape_task[d9910c1a-6e45-429d-b3bc-fc435974d51f]: <unknown>:2:0: syntax error
[2023-08-11 14:26:52,113: INFO/MainProcess] Task rss_feed.tasks.rss_feed_scrape_task[d9910c1a-6e45-429d-b3bc-fc435974d51f] received
[2023-08-11 14:26:52,119: INFO/ForkPoolWorker-8] Task rss_feed.tasks.rss_feed_scrape_task[d9910c1a-6e45-429d-b3bc-fc435974d51f] retry: Retry in 20s: ScrapeRSSFeedFailException(SAXParseException('syntax error'))
[2023-08-11 14:27:12,119: INFO/ForkPoolWorker-8] rss_feed.tasks.rss_feed_scrape_task[d9910c1a-6e45-429d-b3bc-fc435974d51f]: [Task Retry] Attempt 4/5
[2023-08-11 14:27:12,175: INFO/ForkPoolWorker-8] rss_feed.tasks.rss_feed_scrape_task[d9910c1a-6e45-429d-b3bc-fc435974d51f]: [Started] Scraping data from http://feedparser.org/tests/illformed/rss/aaa_illformed.xml ....
[2023-08-11 14:27:12,761: ERROR/ForkPoolWorker-8] rss_feed.tasks.rss_feed_scrape_task[d9910c1a-6e45-429d-b3bc-fc435974d51f]: <unknown>:2:0: syntax error
[2023-08-11 14:27:12,768: INFO/MainProcess] Task rss_feed.tasks.rss_feed_scrape_task[d9910c1a-6e45-429d-b3bc-fc435974d51f] received
[2023-08-11 14:27:12,776: INFO/ForkPoolWorker-8] Task rss_feed.tasks.rss_feed_scrape_task[d9910c1a-6e45-429d-b3bc-fc435974d51f] retry: Retry in 41s: ScrapeRSSFeedFailException(SAXParseException('syntax error'))
[2023-08-11 14:27:53,768: INFO/ForkPoolWorker-8] rss_feed.tasks.rss_feed_scrape_task[d9910c1a-6e45-429d-b3bc-fc435974d51f]: [Task Retry] Attempt 5/5
[2023-08-11 14:27:53,816: INFO/ForkPoolWorker-8] rss_feed.tasks.rss_feed_scrape_task[d9910c1a-6e45-429d-b3bc-fc435974d51f]: [Started] Scraping data from http://feedparser.org/tests/illformed/rss/aaa_illformed.xml ....
[2023-08-11 14:27:54,399: ERROR/ForkPoolWorker-8] rss_feed.tasks.rss_feed_scrape_task[d9910c1a-6e45-429d-b3bc-fc435974d51f]: <unknown>:2:0: syntax error
[2023-08-11 14:27:54,411: ERROR/ForkPoolWorker-8] Task rss_feed.tasks.rss_feed_scrape_task[d9910c1a-6e45-429d-b3bc-fc435974d51f] raised unexpected: UnpickleableExceptionWrapper('rss_feed.exceptions', 'ScrapeRSSFeedFailException', ("SAXParseException('syntax error')",), "ScrapeRSSFeedFailException(SAXParseException('syntax error'))")
Traceback (most recent call last):
  ...
  File "/.../flyio/django-rss-feed-reader/rss_feed/tasks.py", line 61, in rss_feed_task
    raise ScrapeRSSFeedFailException(exc)
celery.utils.serialization.UnpickleableExceptionWrapper: ScrapeRSSFeedFailException(SAXParseException('syntax error'))
When our custom ScrapeRSSFeedFailException is raised, the process of retries start.
"max_retries": 5 means that 5 retry attempts will be performed before giving up. retry_backoff=3 gives us the delay factor on the exponential backoff behaviour. Since retry_jitter is not explicitly set to False, our delays represent any number between zero and the delay value: 3s, 6s, 12s, 24s, 48s (5 attempts). The actual randomized values were: 3s, 0s, 5s, 20s, 41s.
Cool! The retries work like a charm!
It’s time to check out the interface:
Our app uses a lot of packages that are not discussed in this article like django-htmx, and celery-progress to make the components dynamic without the need of reloading the page. You can find more about django-htmx in this article. We can discuss more about the progress bar in another article.
We add the feed url and click follow. Our view creates the Feed object and the task that will parse the feed in the background. In this case, we implemented a progress bar that checks the task and dynamically display the feed when the task is done.
Note that our app returns a response immediately and a new request can be sent. Multiple tasks are being handled in the background and our page is not blocked or stuck awaiting for the the response. That’s awesome! 🤩
Let’s observe our terminal to see what happened with our worker:
[2023-07-28 13:55:19,540: INFO/MainProcess] Task rss_feed.tasks.rss_feed_scrape_task[e7e42229-544f-45c4-af83-ac7a0d9e1be6] received
[2023-07-28 13:55:19,563: INFO/ForkPoolWorker-8] rss_feed.tasks.rss_feed_scrape_task[e7e42229-544f-45c4-af83-ac7a0d9e1be6]: [Started] Scraping data from https://www.djangoproject.com/rss/weblog/ ....
[2023-07-28 13:55:23,560: INFO/MainProcess] Task rss_feed.tasks.rss_feed_scrape_task[d8dacf6c-8fcc-49cc-96b6-8b724e67960b] received
[2023-07-28 13:55:23,612: INFO/ForkPoolWorker-1] rss_feed.tasks.rss_feed_scrape_task[d8dacf6c-8fcc-49cc-96b6-8b724e67960b][Started] Scraping data from https://fly.io/django-beats/feed.xml ....
[2023-07-28 13:55:24,791: INFO/ForkPoolWorker-8] [Frss_feed.tasks.rss_feed_scrape_task[e7e42229-544f-45c4-af83-ac7a0d9e1be6]: [Finished] Data from https://www.djangoproject.com/rss/weblog/ was scraped.
[2023-07-28 13:55:24,798: INFO/ForkPoolWorker-8] Task rss_feed.tasks.rss_feed_scrape_task[e7e42229-544f-45c4-af83-ac7a0d9e1be6] succeeded in 5.256896165999933s: None
[2023-07-28 13:55:28,089: INFO/ForkPoolWorker-1] [Frss_feed.tasks.rss_feed_scrape_task[d8dacf6c-8fcc-49cc-96b6-8b724e67960b]: [Finished] Data from https://fly.io/django-beats/feed.xml was scraped.
[2023-07-28 13:55:28,100: INFO/ForkPoolWorker-1] Task rss_feed.tasks.rss_feed_scrape_task[d8dacf6c-8fcc-49cc-96b6-8b724e67960b] succeeded in 4.534301334002521s: None
Our main process received the task. Our worker picked up our tasks and ran them asynchronous.
Note that we can now introduce a concept of “prefork pool”. This is a type of worker pool that celery uses to execute tasks concurrently based on Python multiprocessing package. Note that when we started our worker, the concurrency config was displayed:
concurrency: 8 (prefork)
The concurrency refers to the configuration of the worker’s concurrency level and the pool implementation that is being used. You have no idea what I’m talking about? Don’t worry, it’s time to take this apart…
The worker’s concurrency level refers to the number of child processes processing the queue. By default, this is the number of CPUs available on our system, in my case, 8 cores. This means that we will have 8 child processes to handle the tasks in parallel. It’s possible to change this number by using --concurrency argument when starting the worker server:
celery -A rss_feed_reader worker -l info --concurrency 3
The prefork is the default type when no pool type is set via the --pool option.
Some other options are: solo, threads, gevent, eventlet, processes and custom. We won’t cover them in this article but you can find great deep dive resources that you can check after you understand the basics.
prefork works as pre-forking the fixed number of child processes when celery worker starts. When a task needs to be processed, it’s assigned to one of those child processes for execution.
We can verify that by checking our output:
[2023-07-28 13:55:19,563: INFO/ForkPoolWorker-8] rss_feed.tasks.rss_feed_scrape_task[e7e42229-544f-45c4-af83-ac7a0d9e1be6]: [Started] Scraping data from https://www.djangoproject.com/rss/weblog/ ....
[2023-07-28 13:55:23,612: INFO/ForkPoolWorker-1] rss_feed.tasks.rss_feed_scrape_task[d8dacf6c-8fcc-49cc-96b6-8b724e67960b]: [Started] Scraping data from https://fly.io/django-beats/feed.xml ....
[2023-07-28 13:55:24,791: INFO/ForkPoolWorker-8] rss_feed.tasks.rss_feed_scrape_task[e7e42229-544f-45c4-af83-ac7a0d9e1be6]: [Finished] Data from https://www.djangoproject.com/rss/weblog/ was scraped.
[2023-07-28 13:55:24,798: INFO/ForkPoolWorker-8] Task rss_feed.tasks.rss_feed_scrape_task[e7e42229-544f-45c4-af83-ac7a0d9e1be6] succeeded in 5.256896165999933s: None
[2023-07-28 13:55:28,089: INFO/ForkPoolWorker-1] rss_feed.tasks.rss_feed_scrape_task[d8dacf6c-8fcc-49cc-96b6-8b724e67960b]: [Finished] Data from https://fly.io/django-beats/feed.xml was scraped.
[2023-07-28 13:55:28,100: INFO/ForkPoolWorker-1] Task rss_feed.tasks.rss_feed_scrape_task[d8dacf6c-8fcc-49cc-96b6-8b724e67960b] succeeded in 4.534301334002521s: None
Note that ForkPoolWorker-8, one of the child processes, picked the first task and started executing it. Meanwhile, before the first task finished, another child process, ForkPoolWorker-1, picked up the next task and started executing it. First task then finished successfully, and finally our second task succeeded. Those tasks were running in parallel across different child processes. Cool, right? 🤩
From the terminal, we can also check the results of the tasks:
...
[2023-07-28 13:55:24,798: INFO/ForkPoolWorker-8] Task rss_feed.tasks.rss_feed_scrape_task[e7e42229-544f-45c4-af83-ac7a0d9e1be6] succeeded in 5.256896165999933s: None
...
[2023-07-28 13:55:28,100: INFO/ForkPoolWorker-1] Task rss_feed.tasks.rss_feed_scrape_task[d8dacf6c-8fcc-49cc-96b6-8b724e67960b] succeeded in 4.534301334002521s: None
That’s good for quick checks but in production, it might be unfeasible to find and inspect them in this way - kinda impossible when you think about medium/big-sized apps. Can we store those results to easily check them when needed and monitor the execution and performance?
Storing the Results
Yes! 🥳
By default, Celery stores tasks results in-memory, specifically in the memory of the worker process that executed the task, which means that once the worker is restarted or stopped, its results will be lost. Besides that, there’s no shared storage between workers which can be tricky if you need to access results across different workers.
Storing those results enables us to access and query them later.
We can use django-celery-results to archive that. This extension allow us to use either the Django ORM or the Django Cache framework as result backend to store Celery task results in a persistent way.
We can go ahead and install it:
python3 -m pip install django-celery-results==2.5.1
We need to add django_celery_results to INSTALLED_APPS in the settings.py:
# <proj>/<proj>/settings.py
# django-rss-feed-reader/rss_feed_reader/settings.py
INSTALLED_APPS = [
    ...
    "django_celery_results",  # <-- Updated!
]
Create the necessary Celery tables by applying the migrations:
python3 manage.py migrate django_celery_results
And finally, configuring Celery to use the django-celery-results backend:
# <proj>/<proj>/settings.py
# django-rss-feed-reader/rss_feed_reader/settings.py
CELERY_RESULT_BACKEND = env.str("CELERY_RESULT_BACKEND", "django-db")
Note that we are using django-db option for CELERY_RESULT_BACKEND. It uses the Django database as a result backend. The results of our tasks will be stored in the database using Django’s ORM.
It’s also possible to use the cache backend. In this case, we can define:
# <proj>/<proj>/settings.py
CELERY_CACHE_BACKEND = env.str("CELERY_CACHE_BACKEND", "django-cache")
using the django-cache option.
We can also use the existing cache defined in CACHES setting, for example:
# <proj>/<proj>/settings.py
CELERY_CACHE_BACKEND = "default"

CACHES = {
    "default": {
        "BACKEND": "django.core.cache.backends.redis.RedisCache",
        "LOCATION": env.str("REDIS_URL", "redis://localhost:6379/"),
    }
}
There are many other options and you can find additional configuration options here.
We can now access those results in the Django Admin:
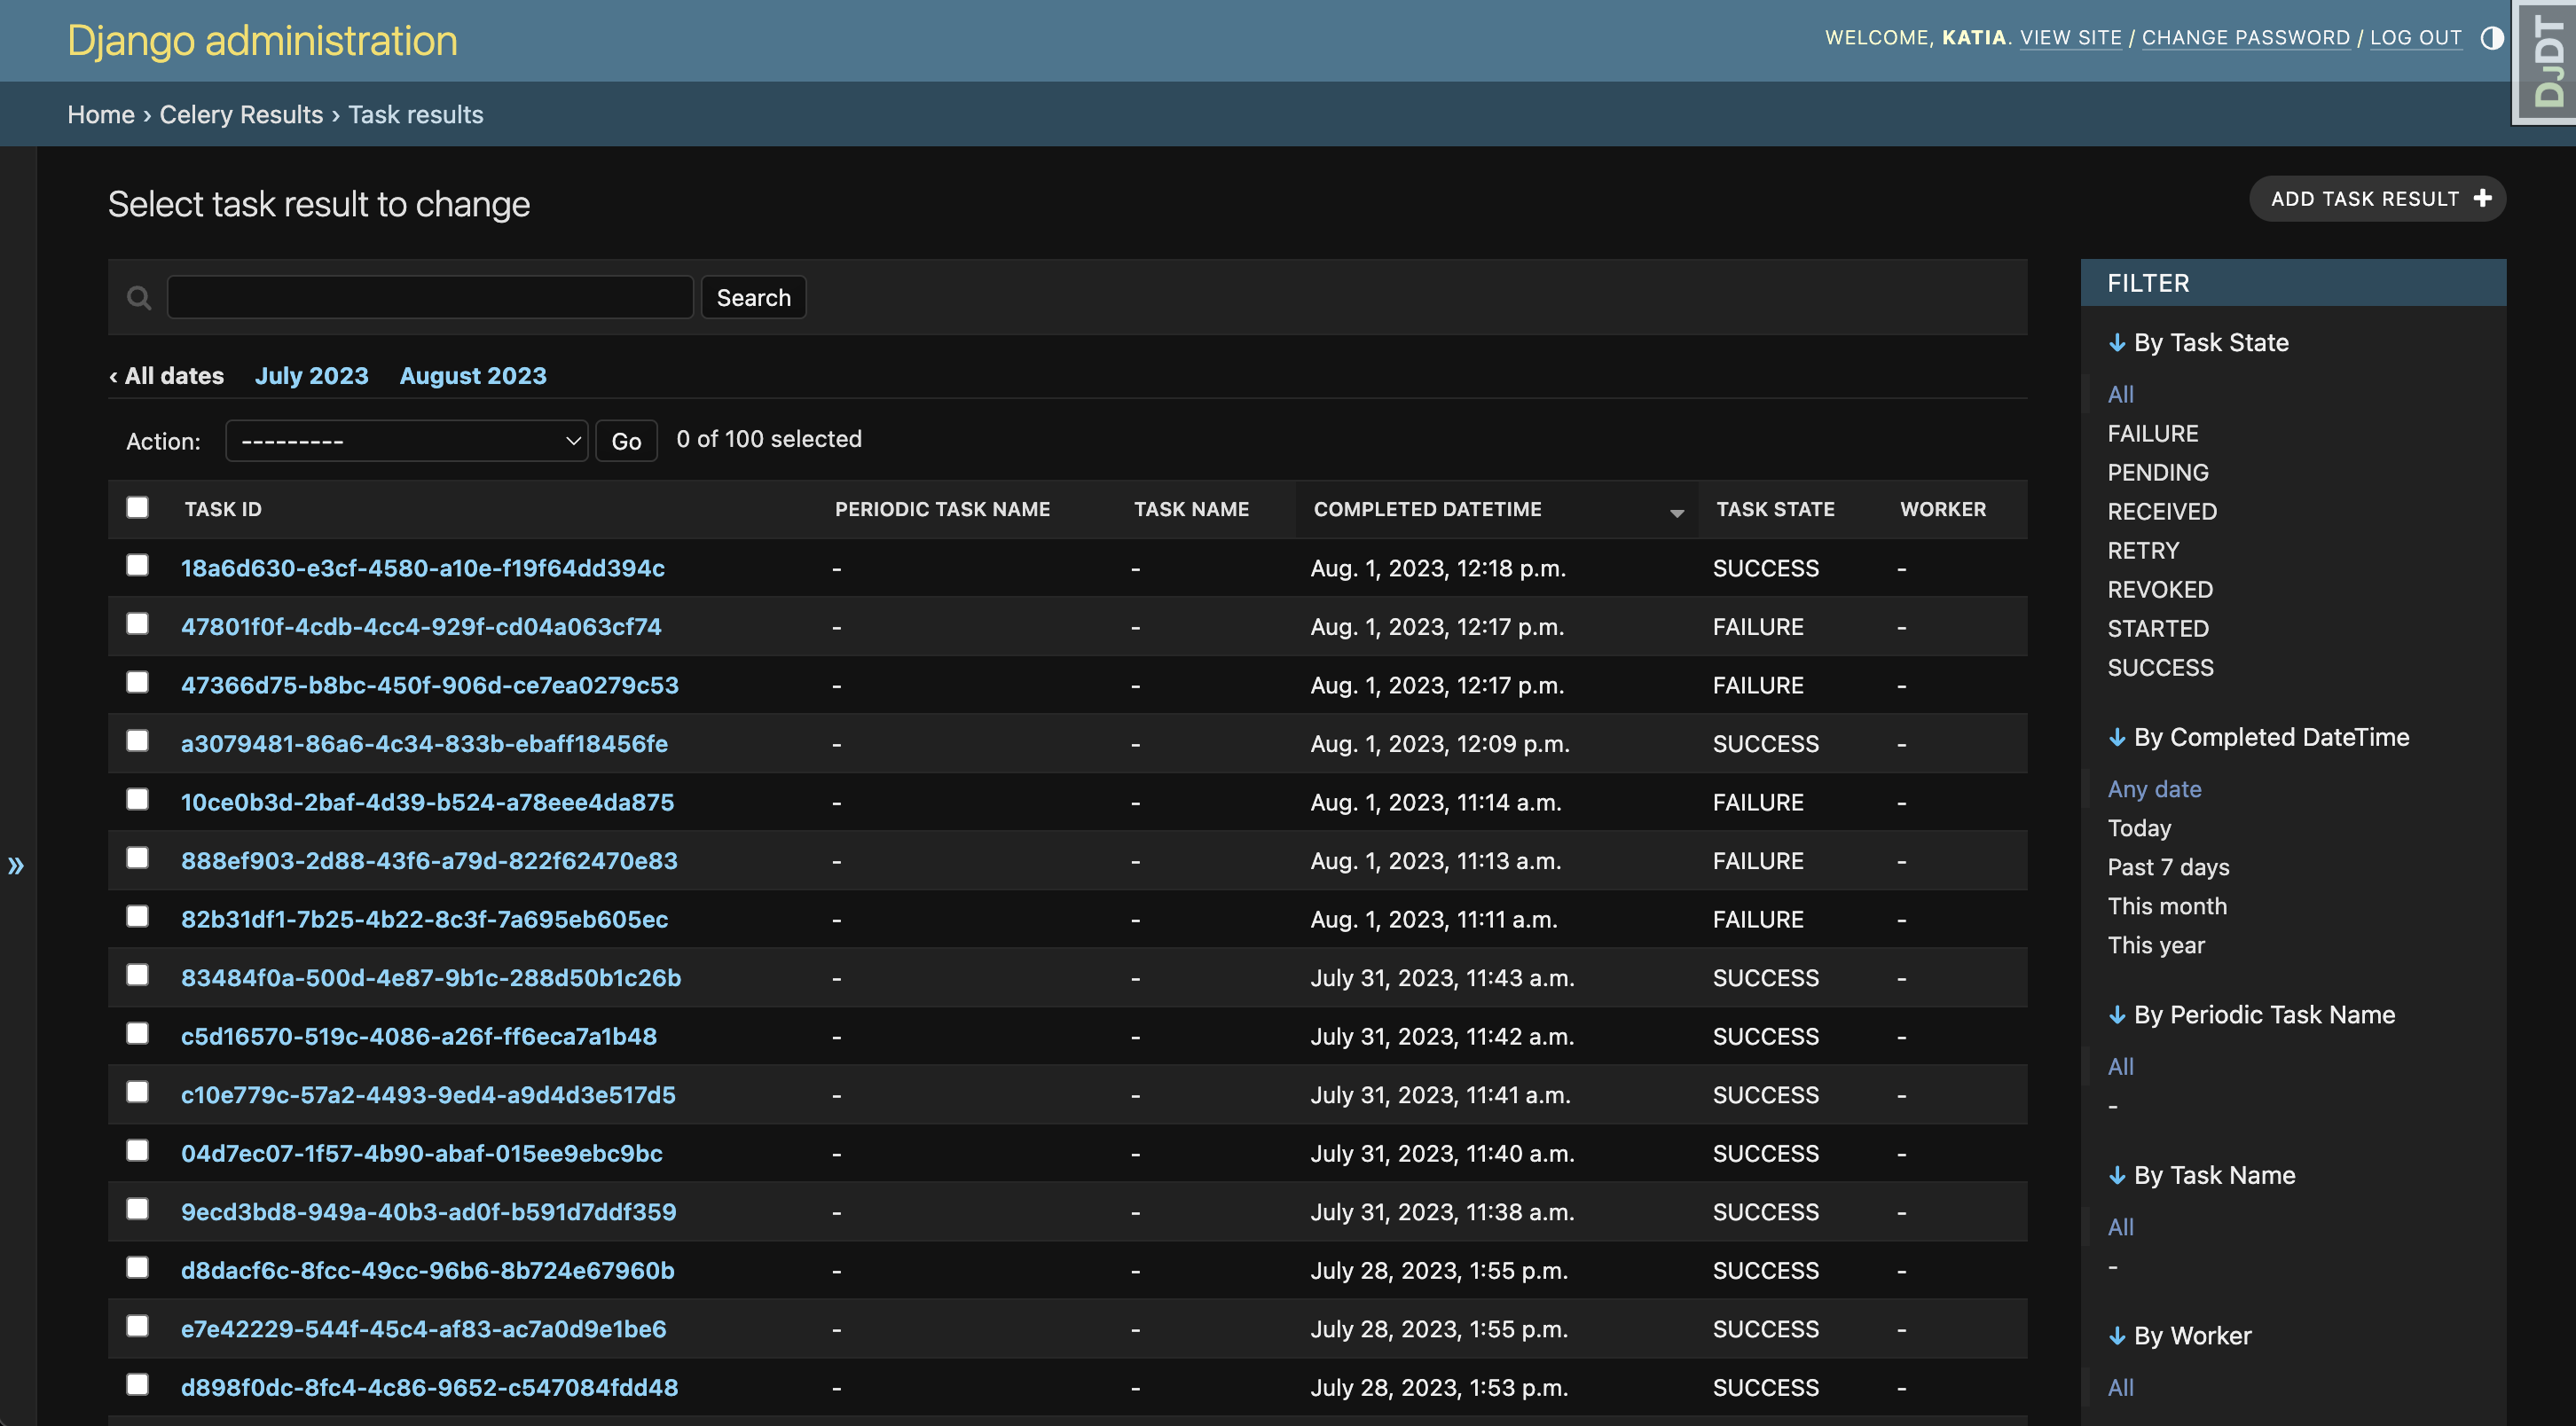
Everything is ready! Let’s take the next steps and deploy our app to Fly.io!
Deploying to Fly.io 🚀
flyctl is the command-line utility provided by Fly.io.
If not installed yet, follow these instructions, sign up and log in to Fly.io.
Fly Apps
Let’s go ahead and create our app by running:
fly launch
Creating app in /.../flyio/django-rss-feed-reader
Scanning source code
Detected a Django app
? Choose an app name (leave blank to generate one): django-rss-feed
? Select Organization: Fly.io (fly-io)
Some regions require a paid plan (bom, fra, maa).
See https://fly.io/plans to set up a plan.

? Choose a region for deployment: Amsterdam, Netherlands (ams)
App will use ‘ams’ region as primary

Created app ‘django-rss-feed’ in organization ‘fly-io’
Admin URL: https://fly.io/apps/django-rss-feed
Hostname: django-rss-feed.fly.dev
Set secrets on django-rss-feed: SECRET_KEY
? Would you like to set up a Postgresql database now? Yes
? Select configuration: Development - Single node, 1x shared CPU, 256MB RAM, 1GB disk
? Scale single node pg to zero after one hour? Yes
Creating postgres cluster in organization fly-io
Creating app...
Setting secrets on app django-rss-feed-db...
Provisioning 1 of 1 machines with image flyio/postgres-flex:15.3@sha256:c380a6108f9f49609d64e5e83a3117397ca3b5c3202d0bf0996883ec3dbb80c8
Waiting for machine to start...
Machine 784e903f2d76d8 is created
==> Monitoring health checks
  Waiting for 784e903f2d76d8 to become healthy (started, 3/3)

Postgres cluster django-rss-feed-db created
  Username:    postgres
  Password:    <>
  Hostname:    django-rss-feed-db.internal
  Flycast:     fdaa:1:2e2a:0:1::4
  Proxy port:  5432
  Postgres port:  5433
  Connection string: postgres://postgres:<your-internal-postgres-password>@django-rss-feed-db.flycast:5432

Save your credentials in a secure place -- you won’t be able to see them again!

Connect to postgres
Any app within the Fly.io organization can connect to this Postgres using the above connection string

Now that you’ve set up Postgres, here’s what you need to understand: https://fly.io/docs/postgres/getting-started/what-you-should-know/
Checking for existing attachments
Registering attachment
Creating database
Creating user

Postgres cluster django-rss-feed-db is now attached to django-rss-feed
The following secret was added to django-rss-feed:
  DATABASE_URL=postgres://django_rss_feed:<your-postgres-password>@django-rss-feed-db.flycast:5432/django_rss_feed?sslmode=disable
Postgres cluster django-rss-feed-db is now attached to django-rss-feed
? Would you like to set up an Upstash Redis database now? Yes
? Select an Upstash Redis plan Free: 100 MB Max Data Size, ($0 / month)

Your Upstash Redis database django-rss-feed-redis is ready.
Apps in the fly-io org can connect to at redis://default:<your-redis-password>@fly-django-rss-feed-redis.upstash.io
If you have redis-cli installed, use fly redis connect to connect to your database.

Redis database django-rss-feed-redis is set on django-rss-feed as the REDIS_URL environment variable
Wrote config file fly.toml

[INFO] Python 3.11.3 was detected. ‘python:3.11-slim-buster’ image will be set in the Dockerfile.

Validating .../flyio/django-rss-feed-reader/fly.toml
Platform: machines
✓ Configuration is valid

‘STATIC_ROOT’ setting was detected in ‘rss_feed_reader/settings.py’!
Static files will be collected during build time by running ‘python manage.py collectstatic’ on Dockerfile.

Your Django app is ready to deploy!

For detailed documentation, see https://fly.dev/docs/django/
There are a few things worth mentioning at this point:
? Would you like to set up a Postgresql database now? Yes
? Select configuration: Development - Single node, 1x shared CPU, 256MB RAM, 1GB disk
? Scale single node pg to zero after one hour? Yes
Creating postgres cluster in organization fly-io
Creating app...
Setting secrets on app django-rss-feed-db...
Provisioning 1 of 1 machines with image flyio/postgres-flex:15.3@sha256:c380a6108f9f49609d64e5e83a3117397ca3b5c3202d0bf0996883ec3dbb80c8
Waiting for machine to start...
Machine 784e903f2d76d8 is created
....
Postgres cluster django-rss-feed-db is now attached to django-rss-feed
The following secret was added to django-rss-feed:
  DATABASE_URL=postgres://django_rss_feed:<your-postgres-password>@django-rss-feed-db.flycast:5432/django_rss_feed?sslmode=disable
Postgres cluster django-rss-feed-db is now attached to django-rss-feed
A PostgreSQL database is set up and the DATABASE_URL environment variable is added to our app.
? Scale single node pg to zero after one hour? Yes
You will see the option to scale to zero Postgres when creating shared-cpu-1x single node cluster. It’s a great option for hobby projects to save some money 💸 when they are not being used.
? Would you like to set up an Upstash Redis database now? Yes
? Select an Upstash Redis plan Free: 100 MB Max Data Size, ($0 / month)

Your Upstash Redis database django-rss-feed-redis is ready.
Apps in the fly-io org can connect to at redis://default:<your-redis-password>@fly-django-rss-feed-redis.upstash.io
If you have redis-cli installed, use fly redis connect to connect to your database.

Redis database django-rss-feed-redis is set on django-rss-feed as the REDIS_URL environment variable
Fly.io offers a fully-managed, Redis-compatible database service. That’s what we are using for this guide as a broker. The REDIS_URL is automatically set as a secret and used in our settings.py to set CELERY_BROKER_URL:
# <proj>/<proj>/settings.py
# django-rss-feed-reader/rss_feed_reader/settings.py
CELERY_BROKER_URL = env.str("REDIS_URL", "redis://localhost:6379/")
You can check the status, or find the url - in case you didn’t save before - by running:
fly redis status django-rss-feed-redis
Redis
  ID             = KbmqPDlbomNk3iyB6p9
  Name           = django-rss-feed-redis
  Plan           = Free
  Primary Region = ams
  Read Regions   = None
  Eviction       = Disabled
  Private URL    = redis://default:<your-redis-password>@fly-django-rss-feed-redis.upstash.io
If you host your own Redis, you can set this environment variable by running:
fly secrets set REDIS_URL=redis://<your-redis-username>:<your-redis-password>@<your-redis-host>
Besides that, a new fly.toml file was generated and we need to update it accordingly:
app = "django-rss-feed"
primary_region = "ams"
...

[processes]  # <-- Updated!
  app = "python -m gunicorn --bind :8000 --workers 2 rss_feed_reader.wsgi"
  worker = "python -m celery -A rss_feed_reader worker -l info"

[env]
  PORT = "8000"

[http_service]
  internal_port = 8000
  force_https = true
  auto_stop_machines = true
  auto_start_machines = true
  min_machines_running = 0
  processes = ["app"]  # only applies to the "app" process
Let’s understand what’s happening here.
Besides our app, we need to run another process, our worker. To accomplish that, we need to define a [processes] section in the fly.toml. Each process is also referred as a process group. Once we have that, flyctl assumes that all the processes are defined in that section. Adding this section means that our app needs to be added there explicitly. Then we define another process for our worker.
Note that flyctl created http_service section automatically. This section defines a service that listens on ports 80 and 443. It’s a simpler alternative for [[services]] section for apps that only need HTTP or HTTPS services. For now, it’s enough for our use case.
It’s all prepped to be deployed to Fly.io! 🚀
Fly Machines
Fly Machines are lightweight VMs based on Firecracker that start up super fast. Machines are the VM building blocks for the Fly Apps Platform.
It’s time to deploy our app:
fly deploy
...
  Finished deploying

Visit your newly deployed app at https://django-rss-feed.fly.dev/
YAY! 🎉 Our app is up and running:
fly open
Let’s find out more details about the deployment:
fly status
App
  Name     = django-rss-feed
  Owner    = fly-io
  Hostname = django-rss-feed.fly.dev
  Image    = django-rss-feed:deployment-01H6P1F1RXGQRE36XJNP9E4JDH
  Platform = machines

Machines
PROCESS ID              VERSION REGION  STATE   ROLE    CHECKS  LAST UPDATED
app     6e82933c7d3058  1      ams     started                 2023-07-31T14:01:13Z
worker  1781194dfdd0e8  1      ams     started                 2023-07-31T13:19:36Z
Both our processes are up and running!
Now, let’s check the logs after triggering a task by using fly logs -a <your-app-name>:
fly logs -a django-rss-feed
...
2023-07-31T14:11:15Z proxy[6e82933c7d3058] ams [info]machine became reachable in 787.641619ms
2023-07-31T14:11:32Z app[1781194dfdd0e8] ams [info][2023-07-31 14:11:32,698: INFO/MainProcess] Task rss_feed.tasks.rss_feed_scrape_task[19168aa2-bab7-472f-8ed6-c89a42865db0] received
2023-07-31T14:11:32Z app[1781194dfdd0e8] ams [info][2023-07-31 14:11:32,711: INFO/ForkPoolWorker-1] rss_feed.tasks.rss_feed_scrape_task[19168aa2-bab7-472f-8ed6-c89a42865db0]: [Started] Scraping data from https://fly.io/django-beats/feed.xml ....
2023-07-31T14:11:37Z app[1781194dfdd0e8] ams [info][2023-07-31 14:11:37,259: INFO/ForkPoolWorker-1] rss_feed.tasks.rss_feed_scrape_task[19168aa2-bab7-472f-8ed6-c89a42865db0]: [Finished] Data from https://fly.io/django-beats/feed.xml was scraped.
2023-07-31T14:11:37Z app[1781194dfdd0e8] ams [info][2023-07-31 14:11:37,263: INFO/ForkPoolWorker-1] Task rss_feed.tasks.rss_feed_scrape_task[19168aa2-bab7-472f-8ed6-c89a42865db0] succeeded in 4.564230344999942s: None
The application used as an example in this article is live here!
📣 If you have a Django-related blog, share your feed with us!
You can also login to the Django Admin using admin/admin. There you can access the task results.
Scaling the Number of Machines
Fly.io allows us to deploy and scale applications (and databases!) all over the world. 🗺 Isn’t that cool?
We can easily scale the number of Machines. Let’s check what we have:
fly regions list
Regions [worker]: ams
Regions [app]: ams
We currently have one Machine for our application and one Machine for our worker, both in ams region.
Besides that, our Redis instance and Postgres database are also running in ams. It’s highly recommended to keep your workers running in the same region as your broker and the result backend. By doing that, we reduce the latency, which means faster communication and task processing, resulting in improved overall performance and responsiveness for your application.
Now, suppose our app is facing a period of high demand. In this case, we might want to process a higher volume of tasks concurrently.
Given the circumstances, we can scale the number of workers, adding a new Machine in Amsterdam, in the Netherlands (ams). We are able to specify the process group (app or worker):
fly scale count worker=2
App 'django-rss-feed' is going to be scaled according to this plan:
  +1 machines for group 'worker' on region 'ams' with size 'shared-cpu-1x'
? Scale app django-rss-feed? Yes
Executing scale plan
  Created 1857299a477d28 group:worker region:ams size:shared-cpu-1x
And verify 2 worker Machines running in ams:
fly scale show
VM Resources for app: django-rss-feed

Groups
NAME    COUNT   KIND    CPUS    MEMORY  REGIONS
app     1       shared  1       256 MB  ams
worker  2       shared  1       256 MB  ams(2)
You can also run your apps globally and scale them as you wish, there are many options and other ways to scale your app running on Fly.io!
You should give a try!
Django really flies on Fly.io
You already know Django makes it easier to build better apps. Well now Fly.io makes it easier to deploy those apps and move them closer to your users making it faster for them too!
Deploy a Django app today! →
What’s Next?
Async tasks provides a powerful and flexible solution for handling time-consuming operations, improving the overall performance and responsiveness of web apps. In this article, we explored some key concepts and benefits of using Celery to manage background tasks, deploying to Fly.io! 🗺
This is just the start… here are a few things we can also consider:
- Integration in existing projects: evaluate your existing projects and identify resource-intensive tasks that can be offload to Celery workers.
- Error handling and monitoring: implement proper error handling and logging mechanisms to track and resolve issues related to the Celery tasks. Use monitoring tools to keep track of task execution and performance.
- Task optimization: when it becomes necessary, optimize your tasks for efficient processing. We can analyse and evaluate splitting large tasks into smaller sub-tasks or considering task chaining to improve performance.
- Security: Ensure that sensitive data and operations are handle securely within the Celery tasks.
- Monitoring and scaling: continuously monitor your Celery workers and task queues to assess performance bottlenecks.
We wish, but this is not a solution to all problems.
It’s important to explore possible solution for your specific use case - you might also want to check “Running tasks concurrently in Django asynchronous views”.
If you have any questions or comments, reach out on the Fly.io Community. That’s a great place to share knowledge, help and get help! 🙂